
Are you tired of your device’s IP address changing all the time? Using a static IP can solve this problem and give you more control over your network.
Imagine having a fixed address that never changes, making it easier to connect to your device remotely or set up important services. You’ll discover simple, step-by-step instructions to set up a static IP on your devices. Whether you’re a beginner or just looking for a quick guide, you’ll find everything you need to make your network more reliable and efficient.
Keep reading to unlock the full potential of your connection!
Benefits Of Static Ip
A static IP address stays the same every time you connect to the internet. This makes it easier to find your device on a network.
Using a static IP can help improve your network and make managing devices simpler.
Improved Network Stability
A static IP keeps your device’s address from changing. This prevents connection problems caused by changing addresses.
With a fixed IP, your network devices communicate smoothly without interruptions or delays.
Simplified Remote Access
A static IP lets you connect to your device from anywhere. You can access your home or work computer easily.
This is useful for remote work, managing servers, or checking security cameras from afar.
- Access files remotely
- Control smart devices
- Use remote desktop tools
Better Device Management
Static IP addresses help you keep track of devices on your network. You always know which device uses which address.
This makes it easier to set up firewalls, assign permissions, and troubleshoot problems quickly.
Choosing Devices For Static Ip
Assigning a static IP means giving a device a fixed address on your network. This helps keep connections stable and easy to manage.
Not all devices need a static IP. You should pick devices that benefit from having a constant network address.
When To Assign Static Ip
Use static IPs when devices need reliable access without changing addresses. This is important for devices that run services or need remote access.
Static IPs help avoid conflicts and make network setup easier for certain devices.
- Devices hosting servers or websites
- Printers shared on the network
- Security cameras and monitoring systems
- Smart home hubs and controllers
- Devices requiring port forwarding
Devices That Benefit Most
Some devices work better with static IPs because they need a steady network location. This helps avoid connection problems.
- Network printers:Easier to find and use by all devices.
- Servers:Always accessible for users and services.
- Security cameras:Reliable recording and remote viewing.
- Home automation hubs:Stable control over smart devices.
- Gaming consoles:Improved connection for online play.
Finding Your Current Network Settings
To use a static IP on your device, first find your current network settings. This helps you set the right values.
Knowing your IP address, subnet mask, and gateway is important. These details keep your device connected.
Checking Ip Address
Your IP address shows your device’s identity on the network. It helps data find your device.
You can find your IP address in network settings on any device. It usually looks like four numbers separated by dots.
- On Windows, open Command Prompt and type
ipconfig - On Mac, go to System Preferences > Network
- On smartphones, check Wi-Fi settings
Identifying Subnet Mask And Gateway
The subnet mask divides your network from others. It helps your device know which addresses belong to your network.
The gateway is the device that connects your network to the internet. Usually, this is your router’s IP address.
- Find subnet mask and gateway in the same place as your IP address
- On Windows, use
ipconfigto see these values - On Mac, look under Network Advanced settings

Credit: pureinfotech.com
Assigning Static Ip On Windows
A static IP address stays the same every time your device connects to a network. It helps in settings that need a fixed address.
Windows lets you set a static IP address easily through network settings. This guide shows how to do it step by step.
Accessing Network Settings
First, open the network settings on your Windows device. This area controls your internet and local network connections.
Click the Start menu, then select Settings. Choose “Network & Internet” to see available connections.
- Click the Start button
- Select Settings (gear icon)
- Choose “Network & Internet”
- Pick “Status” or “Wi-Fi” depending on your connection
- Click “Change adapter options”
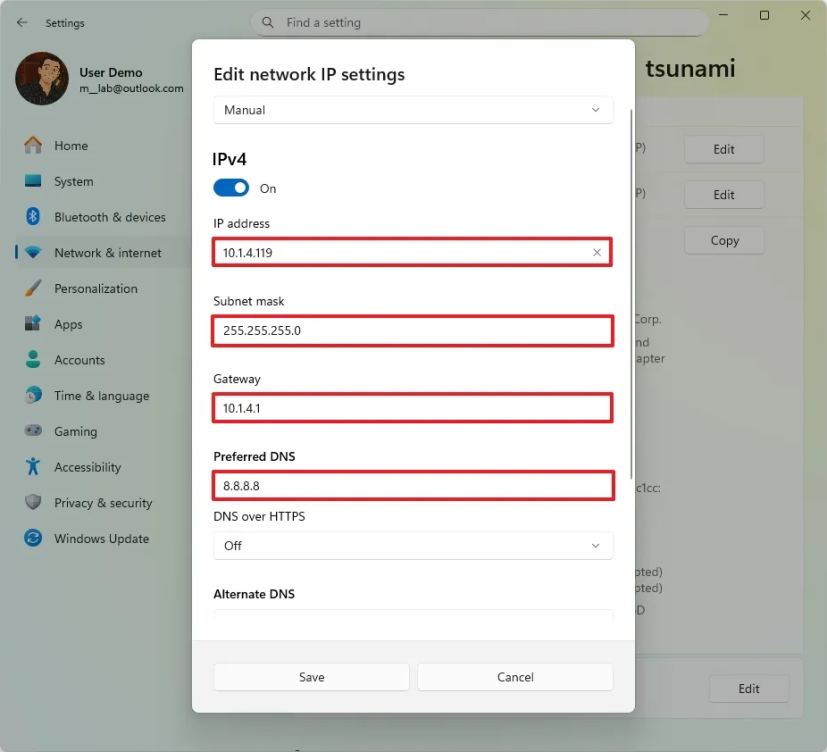
Configuring Ip Address Manually
After accessing the network adapters, find your active connection. Right-click it and select “Properties.”
In the list, select “Internet Protocol Version 4 (TCP/IPv4)” and click “Properties” to set the static IP.
- Choose “Use the following IP address”
- Enter your desired IP address (e.g., 192.168.1.100)
- Set the Subnet mask (usually 255.255.255.0)
- Enter the Default gateway (your router’s IP)
- Set preferred and alternate DNS servers
- Click “OK” to save changes
Setting Static Ip On Mac
A static IP address stays the same every time you connect to the network. It helps devices communicate more easily.
Setting a static IP on a Mac is simple. You can do it through Network Preferences.
Opening Network Preferences
Open Network Preferences to change your Mac’s IP settings. This tool controls how your Mac connects to the internet.
Click the Apple menu. Then select “System Preferences”. Find and click “Network”.
- Click the Apple icon at the top left
- Select “System Preferences”
- Click “Network” to open network settings
Entering Manual Ip Details
Choose the network you use, like Wi-Fi or Ethernet. Click “Advanced” and go to the TCP/IP tab.
Set “Configure IPv4” to “Manually”. Enter the IP address, subnet mask, and router address.
- Choose your network connection
- Click “Advanced” and select “TCP/IP”
- Set “Configure IPv4” to “Manually”
- Enter IP address (e.g., 192.168.1.100)
- Enter Subnet Mask (e.g., 255.255.255.0)
- Enter Router address (e.g., 192.168.1.1)
- Click “OK” and then “Apply”

Credit: m.youtube.com
Configuring Static Ip On Mobile Devices
Using a static IP on your mobile device helps keep a fixed network address. This can improve network stability and access to certain services.
This guide shows how to set a static IP on Android and iOS devices. Follow simple steps to configure your device correctly.
Android Device Setup
Open your Android phone’s Settings app. Go to the Wi-Fi section to find your connected network.
Tap the network name and select “Modify Network” or “Advanced Settings.” Change the IP settings from DHCP to Static.
- Open Settings and tap Wi-Fi
- Tap your connected network
- Select “Modify Network” or “Advanced”
- Change IP settings to Static
- Enter the static IP address, gateway, and DNS
- Save the changes
Ios Device Setup
Open the Settings app on your iPhone. Tap Wi-Fi and find your active network.
Tap the info icon (i) next to the network. Scroll to Configure IP and select Manual. Enter your static IP details.
- Open Settings and tap Wi-Fi
- Tap the “i” icon next to your network
- Choose Configure IP > Manual
- Enter the static IP address, subnet mask, and router
- Save your settings
Troubleshooting Common Issues
Using a static IP on your devices can improve network stability. Sometimes, problems still happen. Troubleshooting helps fix these issues.
This guide covers common problems with static IPs. Learn how to spot and solve IP conflicts and connectivity problems.
Ip Conflicts
IP conflict happens when two devices share the same static IP address. This causes connection problems for both devices.
Check your device’s IP address and compare it with others on the network. Change the IP if a conflict exists.
- Restart the device to refresh its IP settings.
- Use an IP address outside your DHCP range.
- Check router settings for assigned IP addresses.
- Assign unique IPs to each device manually.
Connectivity Problems
Connectivity issues may arise if the static IP is wrong or the network settings don’t match the router.
Make sure the IP address, subnet mask, gateway, and DNS are correct. Incorrect settings stop your device from connecting.
- Verify the subnet mask matches your network.
- Set the default gateway to your router’s IP address.
- Use the correct DNS servers for your network.
- Restart the device and router after changes.

Credit: pureinfotech.com
Maintaining Static Ip Settings
Setting a static IP helps devices keep the same address on a network. This is useful for printers, servers, and other devices that need a fixed address.
To keep static IPs working well, you must maintain the settings on your router and devices. This avoids connection problems and keeps your network stable.
Updating Router Configuration
Your router controls IP addresses for all devices. Update its settings to match your static IP addresses. This prevents IP conflicts and connection errors.
Check your router’s DHCP range and exclude the static IP addresses you assigned. This stops the router from giving those addresses to other devices.
- Log in to your router’s admin page
- Find the DHCP settings section
- Set the DHCP range to avoid static IPs
- Reserve IP addresses if your router supports it
- Save changes and restart the router if needed
Backing Up Network Settings
Backing up your network settings keeps your static IP setup safe. If something goes wrong, you can restore your settings fast.
Save a copy of your router configuration and device IP settings. Keep these files in a safe place for future use.
- Access router’s backup option in settings
- Download the configuration file to your computer
- Write down static IP addresses used on devices
- Use screenshots or notes for device IP settings
- Store backups on external drives or cloud storage
Frequently Asked Questions
What Is A Static Ip Address?
A static IP address is a fixed numerical label assigned to a device. It remains constant over time, unlike dynamic IPs. Static IPs are beneficial for servers and devices that require consistent access. They enhance remote access, hosting services, and network stability.
Why Use A Static Ip On Devices?
Using a static IP ensures consistent network configuration. It facilitates remote access, hosting, and improves network stability. Static IPs are ideal for devices needing uninterrupted connectivity, like servers. They also simplify network management and security.
How To Assign A Static Ip On Windows?
To assign a static IP on Windows, access ‘Network and Sharing Center’. Click ‘Change adapter settings’, right-click your connection, then select ‘Properties’. Choose ‘Internet Protocol Version 4 (TCP/IPv4)’, click ‘Properties’, and input your static IP details. Save changes.
What Are The Benefits Of Static Ips?
Static IPs provide consistent network access and easy remote management. They enhance security and simplify network configurations. Ideal for hosting servers, static IPs ensure reliable connectivity. They also support seamless communication for devices requiring constant IP addresses.
Conclusion
Using a static IP makes your device easier to find on a network. It helps with better control and fewer connection problems. Setting it up is simple and saves time later. Just follow the steps carefully to avoid mistakes. Keep your network organized and devices stable with a static IP.
This small change can improve your internet experience a lot. Try it today and see the difference yourself.
18 min read