Are you frustrated with slow internet or worried about your online privacy? Changing your router’s DNS settings can make a big difference.
It can speed up your connection, block harmful sites, and even give you access to content that’s usually restricted. But if you’re not sure where to start, don’t worry—you’re in the right place. In this guide, you’ll learn exactly how to change your router DNS step-by-step, so you can take control of your internet experience right now.
Keep reading, and you’ll be surprised how simple it really is.
Why Change Router Dns
Your router uses DNS to turn website names into numbers. Changing DNS can improve your internet experience.
Many people do not know that DNS settings affect speed, security, and access to websites.
Impact On Internet Speed
Some DNS servers respond faster than others. A fast DNS can make websites load quicker.
Changing your router DNS can reduce the time it takes to find websites online.
- Faster DNS means faster browsing
- Improves streaming and downloads
- Reduces delays when opening websites
Improved Security
Some DNS services block harmful websites automatically. They protect you from viruses and scams.
Changing your router DNS adds an extra layer of security for all devices on your network.
- Blocks phishing sites
- Stops access to dangerous websites
- Protects kids from harmful content
Access To Restricted Content
Some DNS servers let you reach websites that are blocked by your internet provider.
Changing DNS on your router helps all devices connect to restricted content without extra software.
- Bypass regional blocks
- Access websites blocked by your ISP
- Use without installing apps on devices
Choosing The Best Dns Server
Changing your router’s DNS server can improve your internet speed and security. Picking the right DNS server helps you browse faster and safer.
This guide explains popular DNS providers, what to think about, and how to test DNS performance before you change settings.
Popular Public Dns Providers
Many free DNS providers offer fast and secure services. Each has different features and speeds. Here are some popular options.
- Google DNS– 8.8.8.8 and 8.8.4.4, known for reliability and speed.
- Cloudflare DNS– 1.1.1.1 and 1.0.0.1, focuses on privacy and fast response.
- OpenDNS– 208.67.222.222 and 208.67.220.220, offers security features and parental controls.
- Quad9– 9.9.9.9, blocks harmful websites and protects your devices.
Factors To Consider
Choose a DNS server that fits your needs. Think about speed, security, and privacy before changing your router settings.
- Speed:Faster DNS servers reduce website loading times.
- Security:Some DNS providers block malicious sites automatically.
- Privacy:Look for DNS services that do not log your data.
- Reliability:Use DNS servers that rarely go down.
- Features:Extra options like content filtering may be useful.
Testing Dns Performance
Test DNS speed and reliability before switching. Simple tools help check how well a DNS server works from your location.
- Use apps like DNS Benchmark or Namebench for speed tests.
- Compare response times of several DNS servers.
- Check for any website loading errors after changing DNS.
- Test multiple times to get accurate results.
Accessing Router Settings
Changing your router’s DNS settings requires you to access its settings first. This guide will help you find your router’s IP address and log into the admin panel.
Once you access the router’s settings, you can update the DNS to improve your internet experience.
Finding Router Ip Address
The router IP address is the gateway to your router settings. It is usually a number like 192.168.1.1 or 192.168.0.1.
You can find the router IP on your device or on the router label.
- On Windows, open Command Prompt and type
ipconfig. Look for “Default Gateway”. - On Mac, open Terminal and type
netstat -nr | grep default. - Check the back or bottom of your router for a sticker with the IP address.
Logging Into The Admin Panel
Use a web browser to log into the admin panel. Type the router IP address into the address bar and press Enter.
You will need a username and password to log in. This information is often on the router or in the manual.
- Common usernames are “admin” or “user”.
- Common passwords are “admin”, “password”, or blank.
- If you changed the password before, use that instead.
- If you forget the password, you may need to reset the router.
Credit: www.youtube.com
Changing Dns On Router
Changing the DNS on your router can improve internet speed and security. It lets you use custom DNS servers instead of your Internet Service Provider’s default.
This guide shows how to change your router’s DNS settings easily. Follow the steps to update your DNS addresses.
Navigating To Dns Settings
First, access your router’s admin panel. Open a web browser and enter the router’s IP address in the address bar.
Login with your username and password. Look for sections like “Network,” “Internet,” or “Advanced Settings” to find DNS options.
- Open browser and go to router IP (usually 192.168.1.1)
- Enter admin username and password
- Find “DNS Settings” under Network or Advanced menu
Entering New Dns Addresses
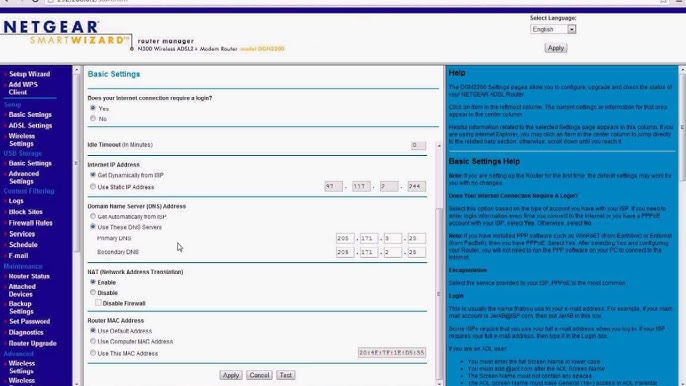
Once you find DNS settings, you can enter new DNS server addresses. These are usually two sets: primary and secondary DNS.
Common public DNS servers include Google DNS (8.8.8.8 and 8.8.4.4) and Cloudflare DNS (1.1.1.1 and 1.0.0.1). Replace the old addresses with your chosen ones.
- Locate Primary DNS field and enter new address
- Locate Secondary DNS field and enter backup address
- Make sure to use valid DNS IPs
Saving And Rebooting Router
After entering the new DNS addresses, save your settings. Look for a “Save,” “Apply,” or “Confirm” button on the page.
To apply changes, reboot your router. This can be done via the admin panel or by unplugging and plugging it back in.
- Click “Save” or “Apply” to keep new DNS settings
- Reboot router to activate the changes
- Check internet connection to confirm DNS update
Verifying Dns Change
After changing your router’s DNS settings, you need to confirm the update worked. This helps ensure your internet uses the new DNS server.
There are easy ways to check the DNS server on your devices and by using online tools.
Checking Dns Server On Devices
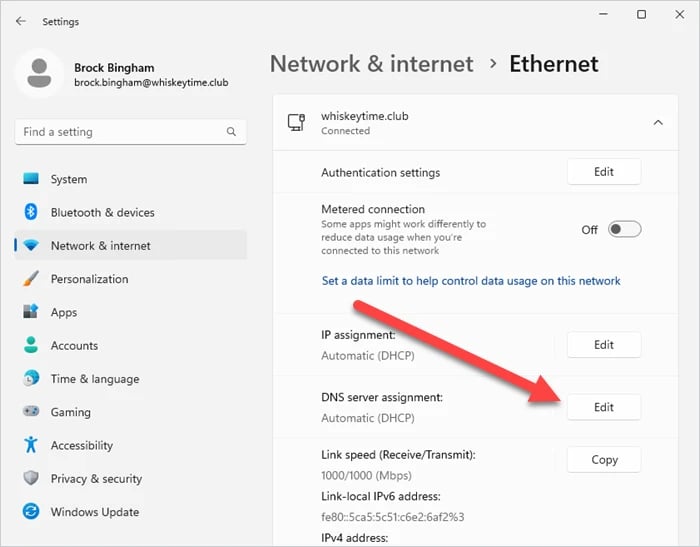
You can check the DNS address directly on your computer or smartphone. This shows if the device uses your new DNS settings.
Look in your device’s network settings to find the DNS server information.
- On Windows, open Command Prompt and type
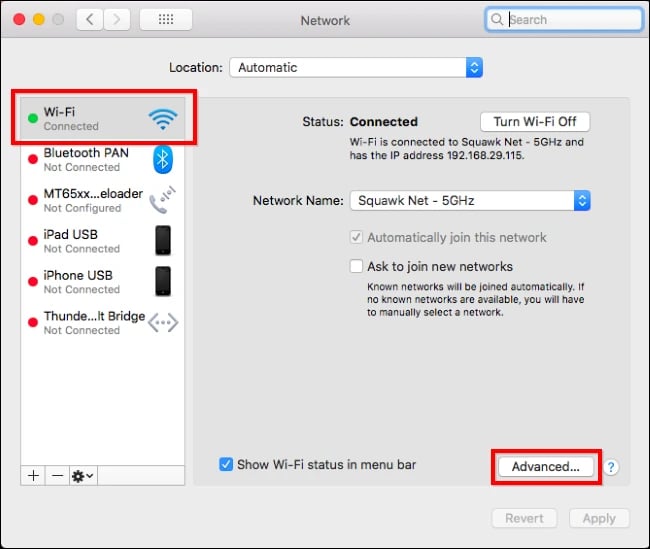
ipconfig /allto see DNS servers. - On Mac, go to System Preferences > Network > Advanced > DNS tab.
- On Android, check Wi-Fi settings and look for IP details.
- On iPhone, tap Wi-Fi, then the “i” next to your network to view DNS.
Using Online Tools
Online tools can quickly show which DNS server your internet uses. These tools check your public DNS from your browser.
Open a DNS checker website and it will display the DNS IP address your device uses.
- Use websites like DNS Leak Test or WhatIsMyDNS to verify your DNS.
- Run a standard or extended test to see detailed DNS info.
- Check if the DNS matches the new address you set on your router.
Troubleshooting Common Issues
Changing your router DNS can improve your internet speed and security. Sometimes problems happen after you change the DNS settings.
Knowing how to fix these common issues will help you get online faster. This guide covers easy ways to solve DNS problems.
Resetting Router
If your internet stops working after changing the DNS, try resetting your router. This clears temporary problems.
To reset, find the small reset button on the router. Press and hold it for 10 seconds using a pin or paperclip.
- Unplug the router power before pressing reset.
- Hold the reset button for 10 seconds.
- Wait 1-2 minutes for the router to restart.
- Check if the internet works after reset.
Clearing Dns Cache
Your device stores DNS information in a cache. This can cause errors if the cache is old or wrong.
Clearing the DNS cache forces your device to get fresh DNS info. This often fixes connection issues.
- On Windows, open Command Prompt and type
ipconfig /flushdns. - On Mac, open Terminal and type
sudo killall -HUP mDNSResponder. - Restart your browser or device after clearing the cache.
Additional Tips For Faster Internet
Changing your router’s DNS can improve your internet speed. There are other ways to get faster internet too.
These tips help your router work better and give you a smoother online experience.
Regular Firmware Updates
Firmware is the software inside your router. It controls how your router works.
Updating firmware fixes bugs and can improve speed and security.
- Check your router’s settings page for update options
- Download updates only from the official router website
- Restart the router after updating firmware
- Set automatic updates if your router supports it
Optimizing Wi-fi Settings
Wi-Fi settings affect how well your internet works over wireless.
Choosing the right channel and frequency can reduce interference and boost speed.
- Select the 5 GHz band for less interference and higher speed
- Pick a Wi-Fi channel with fewer nearby networks
- Place your router in a central, open spot for better coverage
- Use WPA3 or WPA2 security to keep your network safe

Credit: medium.com
Credit: 1gbits.com
Frequently Asked Questions
What Is Dns And Why Change It?
DNS translates domain names to IP addresses. Changing it can improve internet speed, security, and access to blocked sites. Some DNS providers offer better performance and protection against phishing and malware. It’s a simple way to enhance your online experience.
How Can I Find My Router’s Ip Address?
To find your router’s IP address, open Command Prompt. Type ipconfig and press Enter. Look for the “Default Gateway” under your network connection. This is your router’s IP address. You can use it to access the router’s settings.
What Are The Benefits Of Using A Custom Dns?
Using a custom DNS can improve your internet speed and reliability. It can also enhance security by blocking malicious sites. Additionally, it might offer features like parental controls and content filtering. Some DNS services ensure privacy by not logging your browsing history.
How Do I Access My Router’s Settings?
To access your router’s settings, type the router’s IP address into your browser’s address bar. Log in using the default username and password or your customized credentials. From there, navigate to the DNS settings to make changes.
Conclusion
Changing your router DNS can improve your internet speed and security. It only takes a few simple steps to do. You control which DNS servers your devices use. This helps block unwanted sites and keeps browsing safer. Try using popular DNS options like Google or Cloudflare.
Remember to save your settings after changing them. Check your connection to ensure everything works well. Changing DNS is a smart way to enhance your online experience without extra cost. Give it a try and see the difference yourself.
18 min read

