Setting up a VLAN might sound tricky, but it’s easier than you think—and it can make a big difference in your network’s performance and security. If you want to organize your devices, control traffic better, and protect sensitive information, VLANs are the key.
In this guide, you’ll learn exactly how to set up a VLAN step-by-step, even if you’re new to networking. Keep reading, and by the end, you’ll have the confidence to create your own VLAN and take control of your network like a pro.
Benefits Of Vlans
VLANs help divide a large network into smaller parts. This makes the network easier to manage and safer.
Using VLANs improves how data moves and protects important information from outsiders.
Improved Network Security
VLANs keep sensitive data separate from other traffic. This limits access to certain groups of users.
They reduce the chance of unauthorized access and stop threats from spreading across the whole network.
Enhanced Traffic Management
VLANs control how data moves inside the network. They reduce traffic congestion and avoid slowdowns.
By grouping devices logically, VLANs help direct data more efficiently between users and servers.
- Limits unnecessary data sending
- Improves network speed
- Reduces data collisions
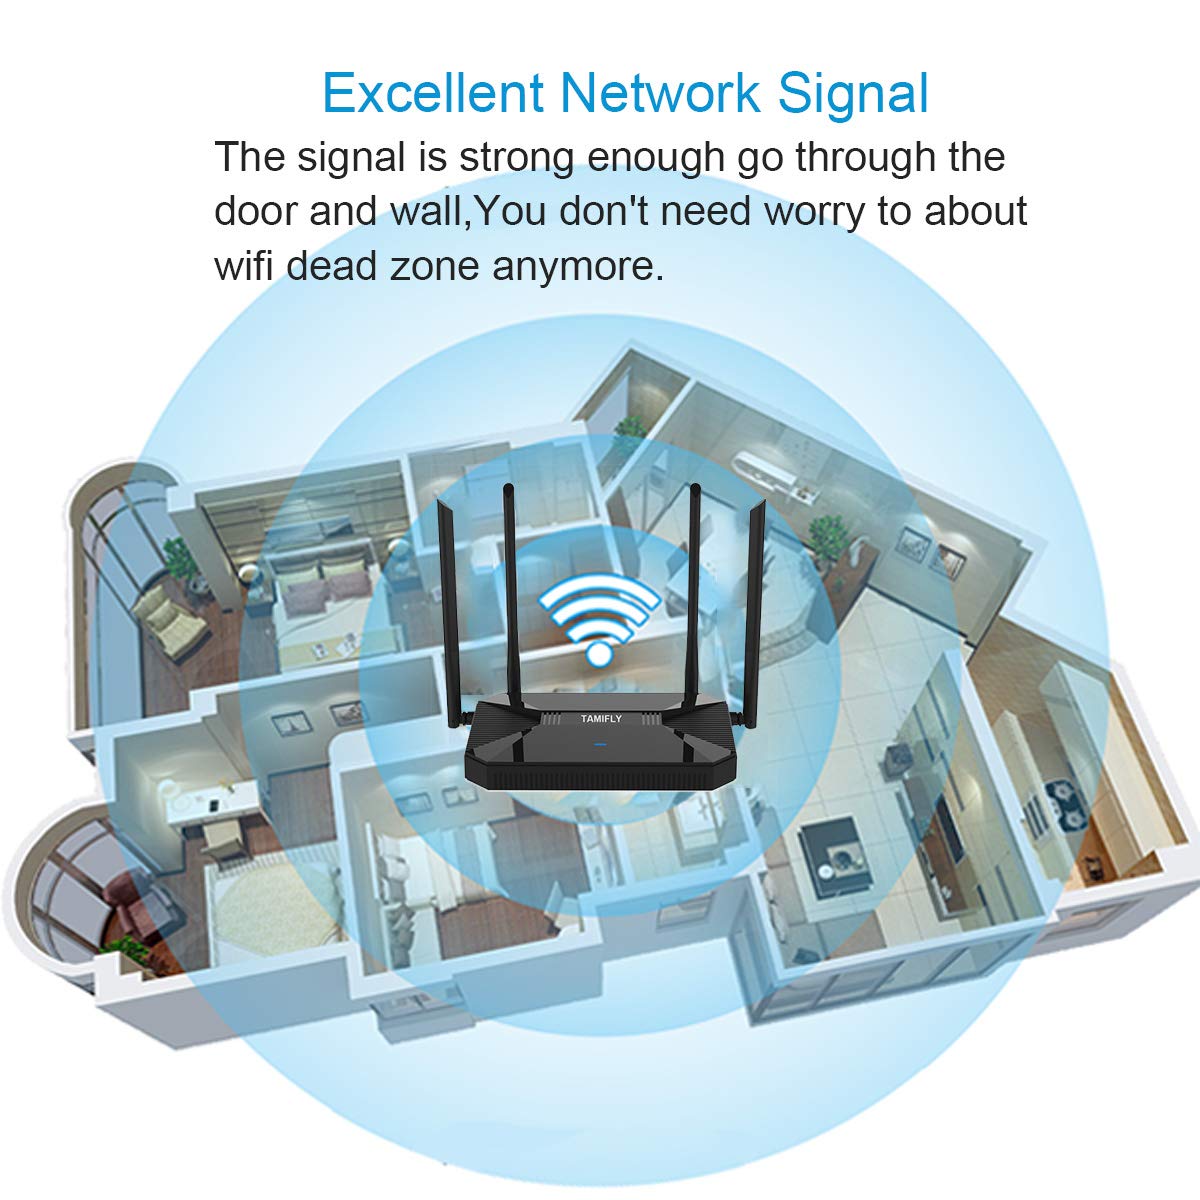
Simplified Network Design
VLANs allow easy changes in network layout without moving physical cables. This saves time and cost.
They help organize devices by function or department, making network structure clear and simple to manage.

Credit: www.reddit.com
Choosing Vlan Types
VLANs help separate network traffic for better security and performance. Choosing the right VLAN type depends on your network needs.
Different VLAN types organize devices in unique ways. Understanding each type helps you pick the best one.
Port-based Vlans
Port-based VLANs assign devices to VLANs by the switch port they connect to. This setup is simple and easy to manage.
Each port belongs to one VLAN, so all devices on that port share the same VLAN ID.
- Easy to configure on most switches
- Good for fixed device locations
- Less flexible for mobile users
Protocol-based Vlans
Protocol-based VLANs group devices by the network protocol they use. This type separates traffic by protocols like IP or IPX.
This helps control and prioritize certain types of data on the network.
- Separates traffic for better control
- Useful for networks with multiple protocols
- Requires switches that support protocol detection
Mac Address-based Vlans
MAC address-based VLANs assign devices to VLANs using their unique MAC addresses. This works well for mobile or changing devices.
Devices keep their VLAN membership regardless of the switch port they connect to.
- Flexible for users who move often
- Improves security by device identification
- Needs more setup and management
Preparing Network Devices
Setting up VLANs starts with preparing your network devices properly. This step helps avoid issues later.
You need to check if your devices support VLANs, update their firmware, and gather network details.
Checking Switch Compatibility
Not all switches support VLANs. You must check if your switch has VLAN features.
Look for switches labeled as “managed” or “smart” because they usually support VLANs.
- Check the switch model number online
- Read the product manual for VLAN support
- Look for VLAN configuration options in the switch interface
- Confirm the number of VLANs the switch can handle
Updating Firmware
Firmware controls the switch’s software functions. Updating it ensures VLAN features work well.
New updates fix bugs and add support for more VLAN options. Check the manufacturer’s website.
- Download the latest firmware version for your switch model
- Follow the update instructions carefully
- Backup current settings before updating
- Restart the switch after the update completes
Gathering Network Information
Knowing your network layout helps you plan VLAN setup. Gather IP addresses and device details.
Write down the connected devices, their roles, and which VLAN they should belong to.
| Device | IP Address | Role | VLAN ID |
|---|---|---|---|
| Office PC 1 | 192.168.1.10 | Employee Workstation | 10 |
| Printer 1 | 192.168.1.20 | Shared Printer | 20 |
| Server 1 | 192.168.1.30 | File Server | 30 |
Configuring Vlan On Switches
VLANs help separate network traffic on a switch. This improves network security and performance.
Setting up VLANs on a switch involves a few simple steps. You need to access the switch, create VLANs, and assign ports.
Accessing The Switch Interface
You must log in to the switch to configure VLANs. Use a console cable or connect via SSH or Telnet.
Open a terminal or command prompt. Enter the switch’s IP address and your login details.
- Connect console cable to switch and computer
- Open terminal software (like PuTTY)
- Use SSH or Telnet with the switch IP
- Enter username and password
Creating Vlan Ids
A VLAN ID is a number that identifies each VLAN. IDs usually range from 1 to 4094.
Use the switch command line to create VLANs. Assign an ID and a name to each VLAN for easy management.
- Enter configuration mode
- Use command to create VLAN and assign ID
- Name the VLAN for clarity
- Save the configuration
Assigning Ports To Vlans
Each port on the switch can belong to one VLAN. Assign ports to VLANs to control traffic flow.
Use commands to select ports and assign them to the correct VLAN ID. Choose access or trunk mode depending on usage.
- Enter interface configuration mode
- Set port mode to access or trunk
- Assign VLAN ID to the port
- Repeat for all needed ports
- Save the changes
Setting Up Vlan Routing
VLAN routing allows devices in different VLANs to communicate. It helps organize networks and improve security.
You can set up VLAN routing using different devices like switches and routers. This guide explains the common ways.
Using Layer 3 Switches
Layer 3 switches can route traffic between VLANs without extra routers. They combine switching and routing functions.
To use a Layer 3 switch, assign IP addresses to VLAN interfaces. Enable routing features on the switch.
- Create VLANs on the switch
- Assign ports to each VLAN
- Configure VLAN interfaces with IP addresses
- Enable IP routing on the switch
Configuring Router On A Stick
Router on a stick uses one physical link between a router and a switch. The router routes traffic between VLANs.
Set up subinterfaces on the router. Each subinterface handles one VLAN with its own IP address.
- Create VLANs on the switch
- Assign switch ports to VLANs
- Make a trunk link to the router
- Create router subinterfaces for each VLAN
- Assign IP addresses to router subinterfaces
Enabling Inter-vlan Communication
Inter-VLAN communication lets devices in different VLANs talk to each other. Routing is needed for this.
Use either a Layer 3 switch or a router to enable communication. Make sure routing and VLAN IDs match.
- Enable IP routing on Layer 3 devices
- Assign correct IPs to VLAN interfaces
- Use access control lists to control traffic
- Test connectivity between VLANs
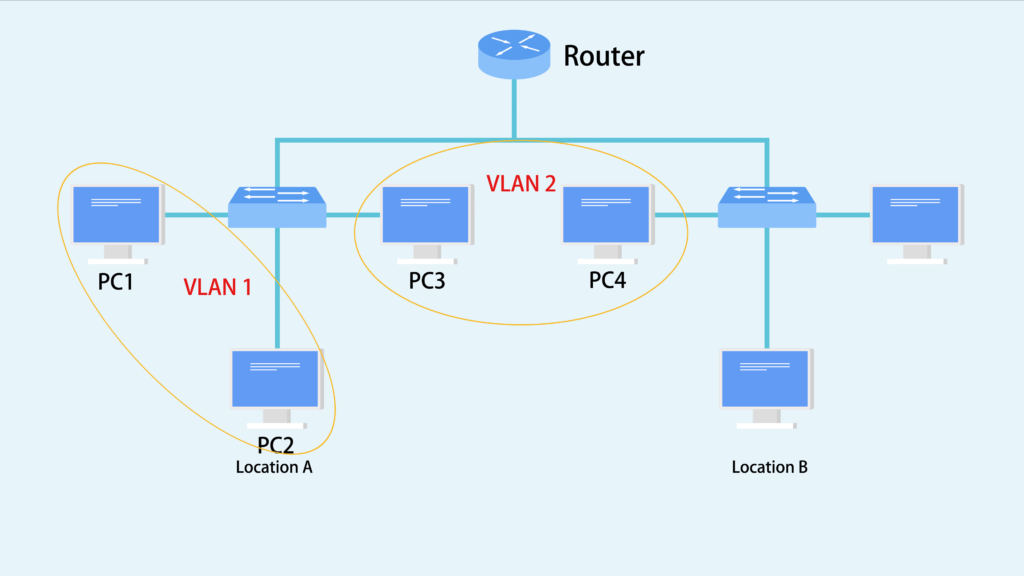
Credit: medium.com
Testing And Verifying Vlan Setup
After setting up VLANs, testing is key. It ensures your VLANs work as planned.
Testing checks if devices are in the right VLAN and if they communicate correctly.
Checking Vlan Membership
Check which devices belong to each VLAN. This helps find mistakes in VLAN assignment.
Use switch commands or management tools to see VLAN memberships.
- On Cisco switches, use
show vlan briefto list VLANs and ports - Check device IP settings to match VLAN IP ranges
- Verify switch port modes (access or trunk) for correct VLAN tagging
Testing Connectivity Between Vlans
Test if devices in different VLANs can talk when allowed. Use ping or traceroute tools.
If inter-VLAN routing is set, devices should reach each other. If not, they should be blocked.
- Ping from one VLAN device to another VLAN device
- Use traceroute to check the path between VLANs
- Test firewall or router rules that control VLAN traffic
Monitoring Network Traffic
Watch VLAN traffic to spot issues or unusual activity. Use network monitoring tools.
Monitoring helps keep the network secure and running smoothly.
- Use port mirroring to capture VLAN traffic for analysis
- Check traffic patterns for each VLAN with monitoring software
- Look for errors or dropped packets on VLAN ports
Common Vlan Issues
Setting up VLANs can improve network performance and security. Still, some common issues can cause problems.
Knowing these issues helps you fix them faster and keep your network stable.
Troubleshooting Connectivity Problems
Connectivity problems happen when devices on the VLAN cannot communicate. This often results from wrong VLAN assignments or cable issues.
Check switch ports and cables first. Make sure devices are in the correct VLAN and the ports are active.
- Verify VLAN ID on each device
- Test cables for damage or loose connections
- Ensure switch ports are configured as access or trunk correctly
- Check for disabled or down ports
Resolving Vlan Mismatch Errors
VLAN mismatch errors occur when switches use different VLAN settings on the same link. This stops VLAN traffic from passing correctly.
Check trunk port settings on connected switches. Both ends must use the same VLAN tagging method and allowed VLANs.
- Confirm both switches use the same trunking protocol (e.g., IEEE 802.1Q)
- Match allowed VLAN lists on both trunk ports
- Check native VLAN settings to avoid untagged traffic issues
- Restart switches if settings were changed
Avoiding Broadcast Storms
Broadcast storms happen when too many broadcast messages flood the network. This slows down or crashes the VLAN.
Use proper network design and controls to stop these storms from starting and spreading.
- Enable Spanning Tree Protocol (STP) on switches
- Limit broadcast traffic by segmenting VLANs properly
- Check for loops in the network cables
- Monitor traffic for unusual broadcast spikes
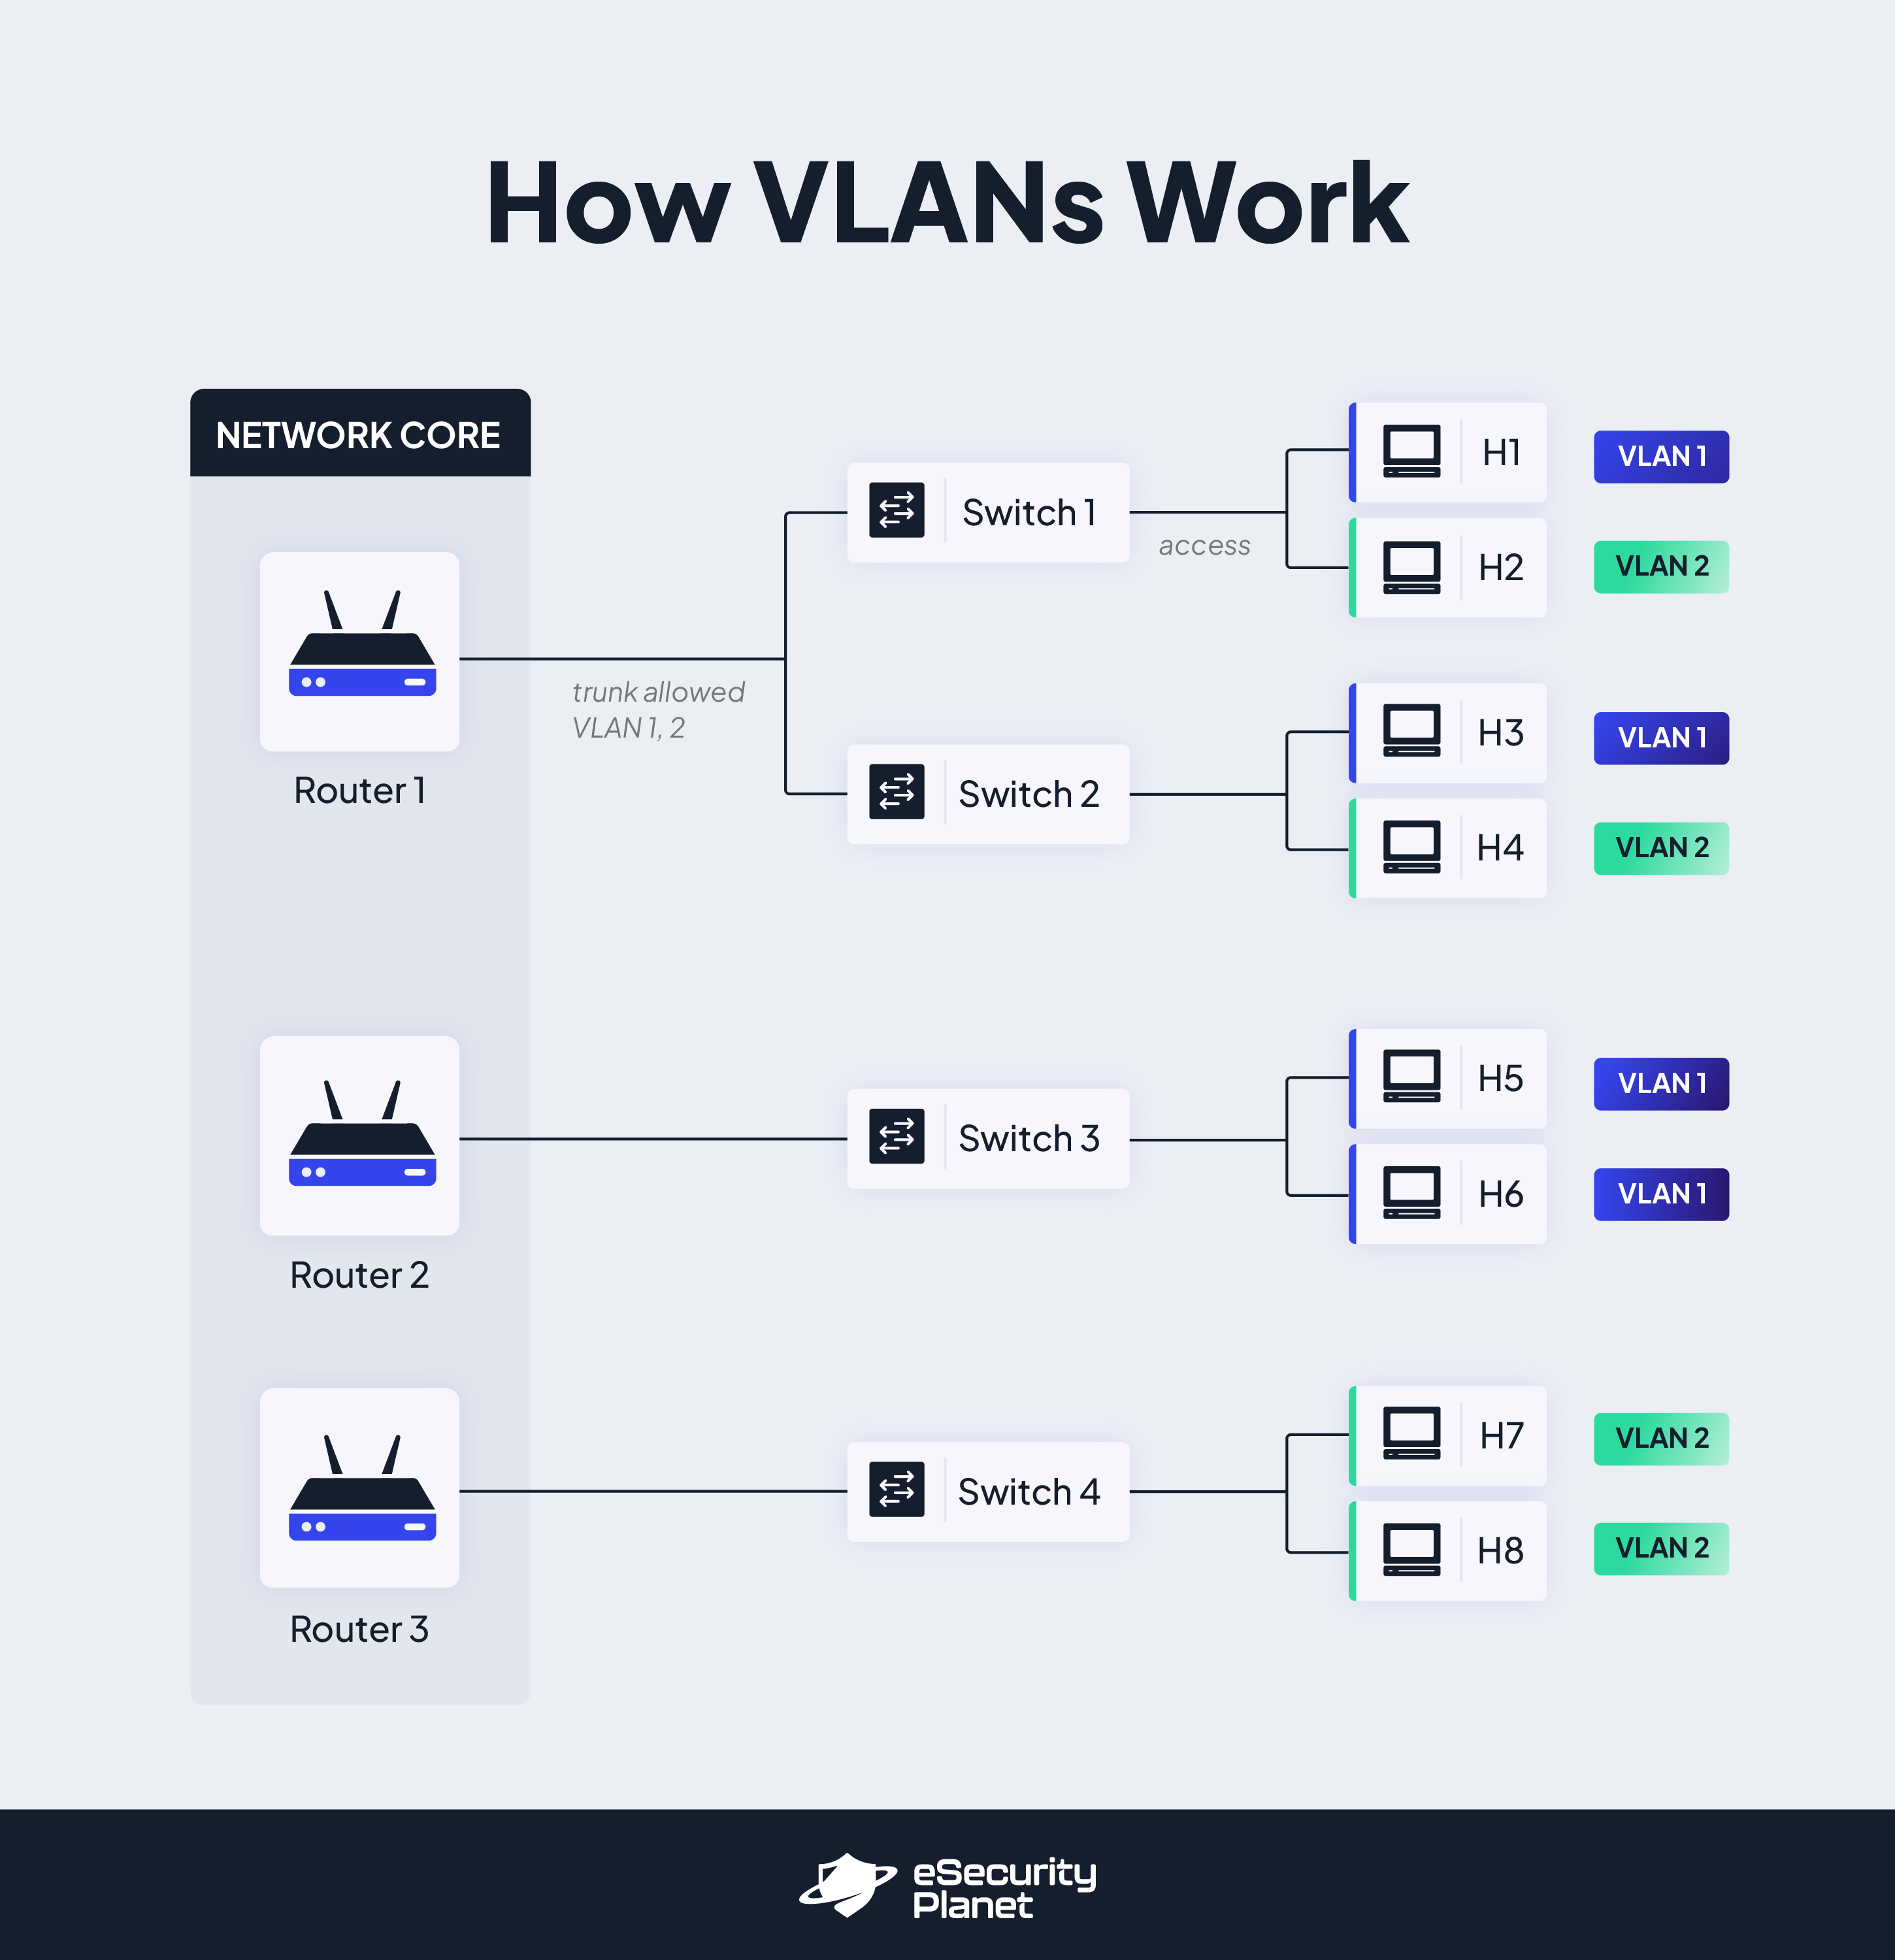
Credit: www.esecurityplanet.com
Best Practices For Vlan Security
VLANs help separate and protect network traffic. They make networks safer by limiting access and controlling data flow.
Following security best practices keeps your VLANs strong and prevents unwanted access to sensitive information.
Implementing Access Control Lists
Access Control Lists (ACLs) control who can access VLAN resources. They filter traffic based on rules you set.
Use ACLs to block unauthorized users and allow only trusted devices to communicate within VLANs.
- Define clear rules for inbound and outbound traffic
- Restrict access by IP address or device type
- Regularly review and update ACL rules
Using Private Vlans
Private VLANs separate devices within the same VLAN. They stop devices from talking directly to each other.
This limits the spread of attacks and increases security inside shared network segments.
- Use isolated VLANs to separate sensitive devices
- Allow communication only through trusted gateways
- Monitor traffic between private VLANs carefully
Regularly Updating Network Policies
Network threats change often. Updating policies keeps your VLAN security current and effective.
Review your security rules and VLAN setups regularly to fix weak spots and adjust to new risks.
- Schedule frequent policy reviews
- Train staff on updated security rules
- Document all changes clearly
Frequently Asked Questions
What Is Vlan And Why Is It Important?
A VLAN (Virtual Local Area Network) segments a network logically. It improves security, reduces congestion, and enhances performance by isolating traffic within groups.
How Do I Assign Vlan Ids Correctly?
Assign VLAN IDs based on your network design. Use unique numbers between 1 and 4094 to avoid conflicts and ensure proper segmentation.
What Equipment Is Needed To Setup A Vlan?
You need managed switches and routers that support VLAN tagging. These devices allow you to create and manage VLANs efficiently.
How To Configure Vlan On A Managed Switch?
Access the switch’s web interface or CLI. Create VLANs, assign ports to VLANs, and save the configuration to activate the setup.
Conclusion
Setting up a VLAN is straightforward with the right steps. Start by identifying your network needs. Use a VLAN-capable switch. Access the switch’s interface. Create and assign VLANs to ports. Test connectivity to ensure success. VLANs help manage network traffic.
They improve security and efficiency. Always keep network documentation updated. Stay informed about network changes. Effective VLAN setup simplifies network management. Remember, practice makes perfect. Keep experimenting and learning. You’ll become more confident over time. Enjoy the benefits of a well-organized network!
19 min read