Imagine having full control over your home’s lighting and appliances with just a tap or voice command. What if you could build this smart setup yourself, without spending a fortune or waiting for a technician?
Making your own DIY smart switch panel is easier than you think, and it gives you the power to customize your space exactly how you want. In this guide, you’ll discover simple steps to create a smart switch panel that fits your needs perfectly.
Ready to transform your home and impress everyone with your tech skills? Let’s get started!

Credit: www.reddit.com
Benefits Of A Diy Smart Switch
Making your own smart switch panel can be a smart choice. It allows you to save money and control your home better.
DIY smart switches fit your needs and add convenience to your daily life.
Cost Savings Compared To Commercial Options
Buying ready-made smart switches can be expensive. Making your own costs much less.
You only pay for the parts you need. This reduces waste and extra costs.
- Cheaper components from online stores
- No extra charges for brand names
- Reuse old parts when possible
Customization For Unique Home Needs
Every home is different. A DIY smart switch lets you choose features that fit your lifestyle.
You can add buttons, sensors, or displays as you want. This makes your switch panel truly yours.
- Custom button layouts for easy use
- Add sensors for lights or temperature
- Choose the style and size of the panel
Enhanced Control And Convenience
DIY smart switches give you better control over your home devices. You can set timers and scenes easily.
Control your lights and appliances from one place. This makes your daily routines simpler and faster.
- Control multiple devices at once
- Set schedules for automatic actions
- Use voice or app control if you want
Essential Components Needed
Making a DIY smart switch panel requires a few key parts. These parts help the switch work safely and smartly.
This guide explains the main components you need to build your smart switch panel at home.
Smart Switch Modules
Smart switch modules control the power to your devices. They act like the on/off button but with smart features.
Choose modules that fit your wiring and support remote control or automation.
- Relay modules to switch high voltage safely
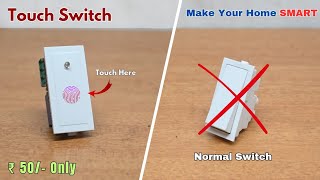
- Touch sensor modules for manual control
- Wi-Fi or Bluetooth modules for remote access
Microcontroller Selection
The microcontroller is the brain of your smart switch panel. It processes commands and controls the modules.
Pick a microcontroller that is easy to program and has enough input/output pins.
- ESP8266 or ESP32 for Wi-Fi support
- Arduino Uno for simple projects
- Raspberry Pi Pico for more power
Power Supply Requirements
Your smart switch panel needs a stable power supply. It powers the microcontroller and switch modules.
Use a power supply that matches your components’ voltage and current needs.
- 5V or 12V DC power adapters
- Voltage regulators for steady output
- Fuse or circuit breaker for safety
Wiring And Connectors
Good wiring and connectors ensure safe and reliable connections. Use the right wires for power and signals.
Label wires and use connectors to make assembly and maintenance easier.
- Use insulated copper wires of proper gauge
- Terminal blocks or screw connectors
- Heat shrink tubes for insulation
Tools Required For Assembly
Making a DIY smart switch panel needs the right tools. These tools help you work safely and build the panel correctly.
This guide shows the main tools you need for assembly. Each tool has a special job in the process.
Soldering Equipment
Soldering equipment joins wires and parts together. It makes strong, lasting connections in your switch panel.
You need a soldering iron, solder wire, and a stand. A good soldering iron heats quickly and keeps a steady temperature.
- Soldering iron with adjustable temperature
- Solder wire (lead-free is safer)
- Soldering iron stand with sponge
- Helping hands or clamps for support
Screwdrivers And Wire Strippers
Screwdrivers tighten screws in your panel parts. Use the right size to avoid damage.
Wire strippers remove insulation from wires. This lets you connect wires without cutting or breaking them.
- Phillips and flathead screwdrivers in various sizes
- Wire stripper tool with multiple gauge settings
- Needle-nose pliers for bending wires
Multimeter For Testing
A multimeter checks electrical parts and connections. It helps find faults before you finish assembly.
Use it to measure voltage, current, and resistance. This ensures the switch panel works safely and correctly.
- Digital multimeter with clear display
- Probes for testing wires and components
- Continuity tester to check connections
Step-by-step Assembly Process
Making a DIY smart switch panel is a fun project you can do at home. This guide helps you build it safely and correctly.
Follow these steps to prepare, install, wire, and program your smart switch panel with ease.
Preparing The Switch Panel Base
Start by choosing a sturdy base for your switch panel. It should hold all parts firmly and fit your space.
Clean the base surface and mark spots for the switch modules. This helps with neat assembly later.
- Select a plastic or wooden panel
- Measure and mark switch locations
- Drill holes if needed for mounting
- Clean dust and debris from the base
Installing Switch Modules
Place each switch module into the marked spots on the panel base. Make sure they fit tightly.
Secure the switches using screws or clips to keep them steady and avoid movement.
- Align switch modules with marks
- Insert switches into holes
- Fix switches with screws or clips
- Check that switches do not wobble
Connecting Wiring Safely
Use insulated wires to connect your switches to the microcontroller. This prevents short circuits and shocks.
Label each wire to match the switch function. This helps avoid confusion during programming.
- Cut wires to needed lengths
- Strip wire ends carefully
- Connect wires to switch terminals
- Use wire connectors or solder joints
- Label each wire with tape or markers
- Keep wires organized and secure
Programming The Microcontroller
Connect the microcontroller to your computer using a USB cable. Open the programming software.
Write code to read switch inputs and control devices. Upload the code to the microcontroller.
- Install microcontroller drivers
- Open code editor or IDE
- Write simple input/output code
- Upload code via USB connection
- Test each switch for proper response
Integrating With Home Automation Systems
Making a DIY smart switch panel is a great way to control your home devices. It works well with home automation systems for easy management.
Connecting your smart switch to home automation lets you control lights and appliances remotely. This integration adds convenience and saves energy.
Wireless Connectivity Options
Wireless connections let your smart switch communicate with other devices without cables. Choose the best option for your home setup.
Common wireless types include Wi-Fi, Zigbee, and Z-Wave. Each has benefits depending on your range and power needs.
- Wi-Fi:Uses your home internet. Easy to set up but uses more power.
- Zigbee:Low power use. Works well in mesh networks for larger homes.
- Z-Wave:Reliable and secure. Ideal for smart home devices.
Compatibility With Voice Assistants
Voice assistants let you control your smart switch by speaking commands. Make sure your switch works with popular assistants.
Most smart switches support Amazon Alexa, Google Assistant, or Apple Siri. This makes hands-free control simple and fast.
- Amazon Alexa: Use voice to turn switches on or off.
- Google Assistant: Control devices with simple phrases.
- Apple Siri: Works with HomeKit for iPhone users.
Mobile App Control Setup
Mobile apps let you control your smart switch from anywhere. Set up the app to connect your switch and phone.
Apps often offer scheduling, device grouping, and status updates. This improves control and monitoring of your home devices.
- Download the app compatible with your switch.
- Create an account or log in.
- Follow app instructions to add your smart switch.
- Use the app to turn devices on or off remotely.
- Set timers or scenes for automation.

Credit: www.reddit.com
Safety Tips And Precautions
Making a DIY smart switch panel involves working with electricity. Safety is very important to avoid accidents. Follow simple rules to protect yourself and your home.
Always prepare well and take your time during installation. Careful handling and testing help prevent problems later.
Handling Electrical Components Safely
Turn off the main power before working with electrical parts. Use insulated tools to avoid shocks. Wear safety gloves and glasses to protect your hands and eyes.
Keep your work area dry and clean. Never touch wires with wet hands. Be careful not to damage wires or connectors during handling.
- Switch off power from the circuit breaker
- Use tools with insulated handles
- Wear protective gloves and glasses
- Keep the workspace dry and tidy
- Avoid touching wires with wet hands
Testing Before Full Installation
Test your smart switch panel before final installation. Use a multimeter to check connections. Confirm that switches respond correctly without sparks or unusual heat.
Testing helps find errors early. Fix any problems before mounting the panel on the wall. This step reduces risks and saves time later.
- Check wire connections with a multimeter
- Verify switch function before final setup
- Look for sparks or overheating signs
- Correct issues before mounting the panel
Ensuring Proper Insulation And Grounding
Use good quality insulation on all wires. Insulation prevents electric shock and short circuits. Make sure no bare wires are exposed.
Ground your smart switch panel properly. Grounding directs excess electricity safely to the earth. It protects people and devices from electric faults.
- Cover wires with proper insulation
- Use heat shrink tubes or electrical tape
- Check that grounding wires are connected well
- Confirm the grounding system meets local codes
Troubleshooting Common Issues
Building a DIY smart switch panel is fun but can have problems. Troubleshooting helps fix issues fast.
Here are common problems and simple ways to solve them. Follow these tips to keep your switch working well.
Switch Not Responding
If the switch does not respond to commands, check the wiring first. Loose or wrong connections stop the switch from working.
Also, make sure the switch firmware is updated. Old software can cause delays or no response.
- Check all wire connections for tightness
- Test the switch with a manual button press
- Update the switch software to the latest version
- Reset the switch if it still does not respond
Connectivity Problems
Smart switches need strong Wi-Fi to work well. Weak signals cause delays or failure to connect.
Try moving the router closer or use a Wi-Fi extender. Check if the network name and password are correct in the switch settings.
- Place the router near the switch panel
- Use Wi-Fi extenders for weak signal areas
- Verify Wi-Fi credentials in the switch app
- Restart your router and switch to refresh connection
Power Supply Failures
The switch needs a steady power supply to work. Power outages or loose power wires stop the switch from turning on.
Check the main power source and circuit breakers. Use a multimeter to test the voltage if you know how.
- Ensure power cables are firmly connected
- Check your home’s circuit breaker for tripped switches
- Test the voltage with a multimeter carefully
- Use a backup power source if power is unstable

Credit: www.reddit.com
Upgrading And Expanding Your Panel
Making a DIY smart switch panel lets you control your home easily. You can upgrade it to add more features over time.
Expanding your panel helps manage more devices and adds new functions for convenience and energy saving.
Adding More Switches
You can increase the number of switches to control more lights or devices. Use a larger panel or a modular design to fit extra switches.
Make sure your wiring supports the added switches. Label each switch clearly for easy use.
- Choose compatible switch modules
- Plan wiring paths carefully
- Use clear labels for each switch
- Test each switch after installation
Integrating Sensors And Timers
Sensors can detect motion, light, or temperature to control switches automatically. Timers let you set switches to turn on or off at set times.
Adding these helps save energy and makes your home smarter without extra effort.
- Motion sensors for automatic lighting
- Light sensors to adjust brightness
- Temperature sensors for climate control
- Timers to schedule switch operations
Future-proofing Your Setup
Design your panel to allow easy upgrades later. Use standard connections and leave space for new parts.
Plan for wireless control or smart home integration to keep your panel useful with new technology.
- Use modular switch designs
- Include extra wiring spaces
- Support wireless communication options
- Choose devices with firmware updates
Frequently Asked Questions
What Tools Are Needed To Make A Diy Smart Switch Panel?
You need a microcontroller, relays, switches, wiring, a power supply, and basic soldering tools. Optional items include a Wi-Fi module and enclosure.
How Does A Diy Smart Switch Panel Work?
It uses a microcontroller to control relays that switch electrical devices on or off remotely or via physical buttons.
Can I Control The Smart Switch Panel Via Smartphone?
Yes, by integrating Wi-Fi or Bluetooth modules, you can control the panel using a smartphone app.
Is It Safe To Install A Diy Smart Switch Panel?
Yes, if you follow electrical safety guidelines, use proper insulation, and work with low-voltage components when possible.
Conclusion
Creating a DIY smart switch panel is easier than you think. You can save money and learn new skills. Simple tools and clear instructions make it doable. Enjoy the satisfaction of building something useful. A smart switch panel can make life more convenient.
Control lights with ease. Impress friends with your tech skills. Remember, safety is important. Always follow instructions carefully. Don’t rush. Take your time for the best results. Share your project with others. Inspire them to try DIY projects too. Start today and see the difference it makes!
23 min read

