
Are you ready to bring smart technology into your home without spending a fortune? A smart speaker DIY kit lets you build your own voice-controlled assistant, tailored exactly to your needs.
Imagine having your music, reminders, and smart home devices all connected through a gadget you created yourself. You’ll discover why purchasing a smart speaker DIY kit is a game-changer and how it can give you control, customization, and satisfaction like no off-the-shelf device.
Keep reading to find out how easy and rewarding this project can be for you.

Credit: www.amazon.in
Why Choose A Smart Speaker Diy Kit
Smart speakers are popular for home use. Building your own kit is a fun and useful project.
This guide explains why a smart speaker DIY kit can be a good choice for you.
Benefits Of Building Your Own
Building your own smart speaker helps you learn new skills. It is also a creative way to spend time.
You get to understand how the device works inside. This knowledge can help with future tech projects.
Cost Savings Compared To Ready-made
DIY kits usually cost less than buying a finished smart speaker. You pay only for parts and tools.
There are no extra charges for brand or marketing. This saves money while still getting a good product.
- Lower price for parts
- No brand fees
- Reusable tools for other projects
Customization Opportunities
With a DIY kit, you can choose how your smart speaker looks and works. This is not possible with ready-made devices.
You can add features you need and remove those you do not want. This makes the device truly yours.
- Select the speaker size and shape
- Choose the voice assistant software
- Add extra sensors or buttons
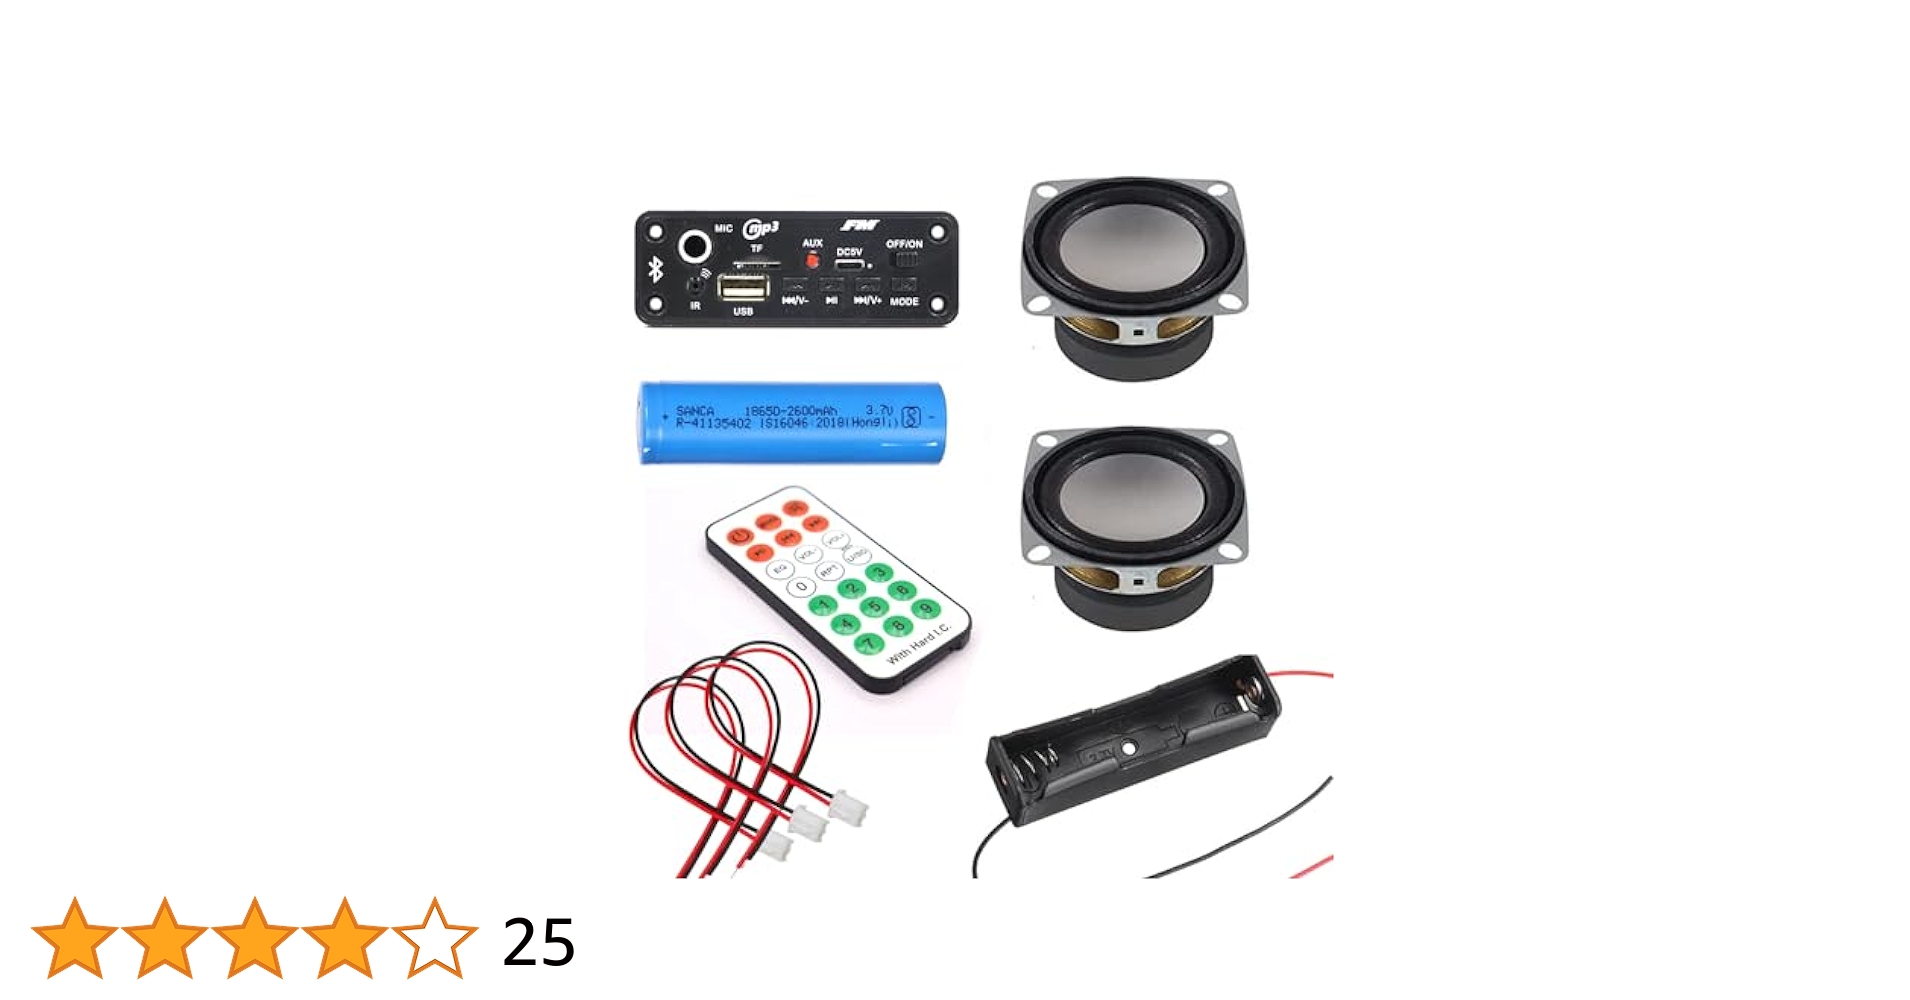
Essential Components In A Diy Kit
Building your own smart speaker is fun and educational. A good DIY kit includes all key parts.
Knowing the main components helps you choose the right kit for your project.
Microcontroller And Processor Options
The microcontroller is the brain of the smart speaker. It runs the software and processes data.
Popular choices include boards like Raspberry Pi and Arduino. They offer good power and flexibility.
- Raspberry Pi: Strong processor, supports Linux OS
- Arduino: Easy to use, good for simple tasks
- ESP32: Built-in Wi-Fi and Bluetooth, low power
Microphone And Speaker Choices
Microphones capture your voice commands. Speakers play responses and sounds clearly.
Look for high-quality microphones with noise cancellation. Choose speakers that match your room size.
- Electret microphones: Affordable, good for voice detection
- MEMS microphones: Small, precise, and stable
- Full-range speakers: Balanced sound for most uses
- Woofers and tweeters: Better bass and treble
Power Supply And Connectivity
A steady power supply keeps your smart speaker running without issues. USB power adapters are common.
Connectivity options let the device connect to the internet and other gadgets. Wi-Fi and Bluetooth are essential.
- Power supply: USB adapters, rechargeable batteries
- Wi-Fi modules: Connect to home networks
- Bluetooth modules: Pair with phones and other devices
- Wired connections: USB or audio jacks for extra options
Step-by-step Assembly Guide
Building your smart speaker from a DIY kit can be fun and educational. This guide helps you put everything together easily.
Follow the steps carefully to prepare your workspace, connect hardware, and install the software.
Preparing Your Workspace
Start by clearing a flat surface to work on. Make sure you have good lighting and enough space for all parts.
Gather your tools like screwdrivers, wire cutters, and a multimeter. Keep small parts in containers to avoid loss.
- Clear a flat and clean table
- Use bright light to see details
- Have tools ready and organized
- Keep small pieces in containers
Connecting Hardware Components
Start by placing the main circuit board on your workspace. Carefully connect the speaker, microphone, and buttons.
Use the kit instructions to match wires and ports. Double-check connections to avoid mistakes before powering on.
- Place the main board on a non-metal surface
- Connect speaker wires to the correct ports
- Attach the microphone securely
- Connect any buttons or switches
- Check all wires for tight connections
Installing Software And Firmware
Download the software files from the kit’s official source. Use a computer to load the firmware onto the main board.
Follow instructions to install drivers if needed. After installation, test your smart speaker for proper function.
- Download the latest firmware files
- Connect the board to your computer
- Use recommended software to upload firmware
- Install any required drivers
- Test the speaker and microphone

Credit: futureproofhomes.net
Programming Your Smart Speaker
Programming your smart speaker lets you control it your way. You can add custom features and make it smarter.
This guide helps you set up your smart speaker with easy programming steps. You will learn how to choose a voice assistant, write commands, and link devices.
Selecting A Voice Assistant Platform
Pick a voice assistant platform that fits your needs. Popular options include Google Assistant, Amazon Alexa, and Mycroft.
Each platform has different tools and languages. Choose one that matches your programming skills and goals.
- Google Assistant uses Actions SDK and Dialogflow
- Amazon Alexa supports Alexa Skills Kit and AWS Lambda
- Mycroft is open-source and Python-friendly
Writing Custom Commands
Create commands to control your smart speaker easily. Use simple phrases your speaker will understand.
Write code that tells the speaker what to do when you say a command. Test your commands to make sure they work well.
- Define clear trigger phrases
- Use the platform’s coding language
- Test commands in the development environment
Integrating With Smart Home Devices
Connect your smart speaker to devices like lights, thermostats, and cameras. This lets you control your home with voice commands.
Make sure your devices support the voice assistant platform you chose. Use APIs or apps to link them together.
- Check device compatibility with your platform
- Use device APIs for integration
- Test commands to control devices smoothly
Troubleshooting Common Issues
Building a smart speaker DIY kit can be exciting. Sometimes, things may not work as expected.
This guide helps you fix common problems with your smart speaker kit.
Hardware Malfunctions
Hardware issues can stop your smart speaker from working. Check all connections first.
Look for loose wires, damaged parts, or poor soldering on the circuit board.
- Ensure the power supply is stable and connected properly.
- Check the microphone and speaker for physical damage.
- Test buttons and switches for responsiveness.
- Use a multimeter to find broken circuits or shorts.
Software Bugs And Fixes
Software bugs can cause your smart speaker to freeze or act oddly. Restart your device to clear temporary errors.
Update the software regularly to fix bugs and add improvements.
- Check for firmware updates from the kit provider.
- Reset the software to factory settings if problems persist.
- Reinstall the voice assistant program if it crashes.
- Use debugging tools if you are comfortable with coding.
Improving Voice Recognition
Voice recognition may not work well in noisy places. Keep your smart speaker away from loud sounds.
Speak clearly and close to the microphone to improve accuracy.
- Train the voice assistant with your voice if possible.
- Use noise-canceling microphones for better sound capture.
- Adjust the microphone sensitivity in the settings.
- Reduce background noise during use.
Enhancing Your Smart Speaker
Building a smart speaker with a DIY kit lets you improve its abilities. You can add new functions, upgrade parts, and change its look.
These changes help your speaker fit your needs better. You get more control and a device that feels personal and useful.
Adding New Features
You can add new features to your smart speaker to make it smarter. This might include voice commands, alarms, or music controls.
New features can improve how you interact with the device and increase its usefulness in your daily life.
- Voice assistant support
- Bluetooth or Wi-Fi connectivity
- Custom sound effects or alerts
- Smart home device control
Upgrading Components
Upgrading parts can boost your smart speaker’s performance. You can replace speakers, microphones, or processors.
Better components improve sound quality, response time, and overall reliability of your device.
- Higher quality speaker drivers
- Noise-canceling microphones
- Faster microcontrollers or chips
- Improved power supply units
Personalizing Design And Appearance
Changing the design lets your smart speaker match your style. You can adjust colors, shapes, and materials.
Personal touches make your speaker unique and fit well in your home or office space.
- Custom paint or decals
- Different shapes or sizes
- Unique casing materials
- LED lights for visual effects
Where To Buy Quality Diy Kits
Buying a smart speaker DIY kit is a great way to learn and create. Finding a quality kit is important to get good parts and clear instructions.
Many stores sell DIY kits, but some offer better quality and support than others. This guide helps you find the best places to buy.
Top Online Retailers
Online retailers have many smart speaker DIY kits. They often include detailed descriptions and reviews from buyers. You can compare prices and shipping options easily.
- Amazon offers a wide range of kits from different brands.
- Adafruit provides kits focused on learning and quality parts.
- eBay has new and used kits, sometimes at lower prices.
Community Recommendations
Many DIY electronics communities share their favorite kits. These suggestions come from people who have tried the kits themselves. Forums and social media groups can be great places to ask for advice.
- Reddit’s r/diyelectronics has user reviews and ideas.
- Instructables often features project guides with recommended kits.
- Hackster.io hosts projects and kit recommendations from makers.
Budget-friendly Options
Not all quality kits are expensive. Some budget-friendly kits offer good parts and simple instructions. These are perfect for beginners or those on a tight budget.
- Look for kits with basic parts and no extra accessories.
- Check local electronics stores for DIY kits on sale.
- Buy kits that allow adding parts later to save money upfront.

Credit: www.pcworld.com
Frequently Asked Questions
What Is Included In A Smart Speaker Diy Kit?
A smart speaker DIY kit usually includes a speaker module, microphone, control board, wiring, and assembly instructions. Some kits also have software guides for setup and customization.
How Difficult Is It To Build A Smart Speaker Diy Kit?
Building a smart speaker kit requires basic electronics knowledge and soldering skills. Most kits come with clear instructions, making the process manageable for beginners and hobbyists.
Can I Customize The Features Of My Diy Smart Speaker?
Yes, many DIY kits allow customization of voice assistants, sound quality, and connectivity options, letting you tailor the speaker to your preferences and needs.
Are Diy Smart Speakers Compatible With Popular Voice Assistants?
Many DIY kits support popular voice assistants like Alexa, Google Assistant, or custom open-source alternatives, enhancing functionality and smart home integration.
Conclusion
Purchasing a smart speaker DIY kit offers exciting possibilities. It’s a fun project for tech enthusiasts. You learn while building your own device. These kits provide flexibility and customization. You choose features and design. They suit beginners and experienced makers.
Instructions are clear and easy to follow. Completing the kit boosts your skills and confidence. It’s a cost-effective way to enjoy smart technology. Engage in a rewarding experience. Build your own smart speaker today. Enjoy music, control devices, and explore new tech.
A smart investment for curious minds. Dive into the world of DIY smart devices.
18 min read