
Setting up a security camera network might seem tricky, but it doesn’t have to be. Imagine having eyes everywhere, watching over your home or business, giving you peace of mind no matter where you are.
You want a system that’s reliable, easy to manage, and tailored to your needs. In this guide, you’ll discover simple steps to build a security camera network that works for you—without the confusion or extra costs. Ready to take control of your safety?
Keep reading, and you’ll learn exactly how to set up a network that keeps you connected and protected.

Credit: www.camius.com
Choosing The Right Cameras
Choosing the right security cameras is important for a good network setup. Different cameras work best in different places and situations.
You need to pick cameras that fit your needs for safety and budget. Learn about camera types and features before buying.
Types Of Security Cameras
There are many types of security cameras. Each type suits different uses and places.
- Dome cameras are small and good for indoor use.
- Bullet cameras are long and fit well outside.
- PTZ cameras can move and zoom to cover large areas.
- Wireless cameras are easy to install without wires.
- Wired cameras offer stable connections and power.
Camera Features To Consider
Look for key features to get the best camera for your needs. Features affect how well the camera works.
- Resolution: Higher resolution gives clearer images.
- Night Vision: Helps see in the dark or low light.
- Field of View: Wide view covers more area.
- Motion Detection: Alerts you when there is movement.
- Storage Options: Check if it saves videos on cloud or SD card.
- Power Source: Battery, wired, or solar options affect placement.
Indoor Vs Outdoor Cameras
Indoor and outdoor cameras have different designs. Choose the right type based on where you want to install them.
Indoor cameras focus on rooms and hallways. Outdoor cameras must resist weather and vandalism.
- Indoor cameras are smaller and less weatherproof.
- Outdoor cameras have strong cases to handle rain and dust.
- Some outdoor cameras have heaters to work in cold weather.
- Choose cameras with good night vision for outdoor use.
Credit: vikylin.com
Planning Your Network Layout
Setting up a security camera network needs good planning. A clear layout helps cover all important areas.
Think about where cameras go and how they connect. This saves time and avoids problems later.
Identifying Key Coverage Areas
Find spots that need watching closely. Look for entrances, exits, and places with valuable items.
Make a list of these areas. Check blind spots where cameras might miss activity.
- Front and back doors
- Garage and driveway
- Hallways and staircases
- Storage rooms
- Yards and gardens
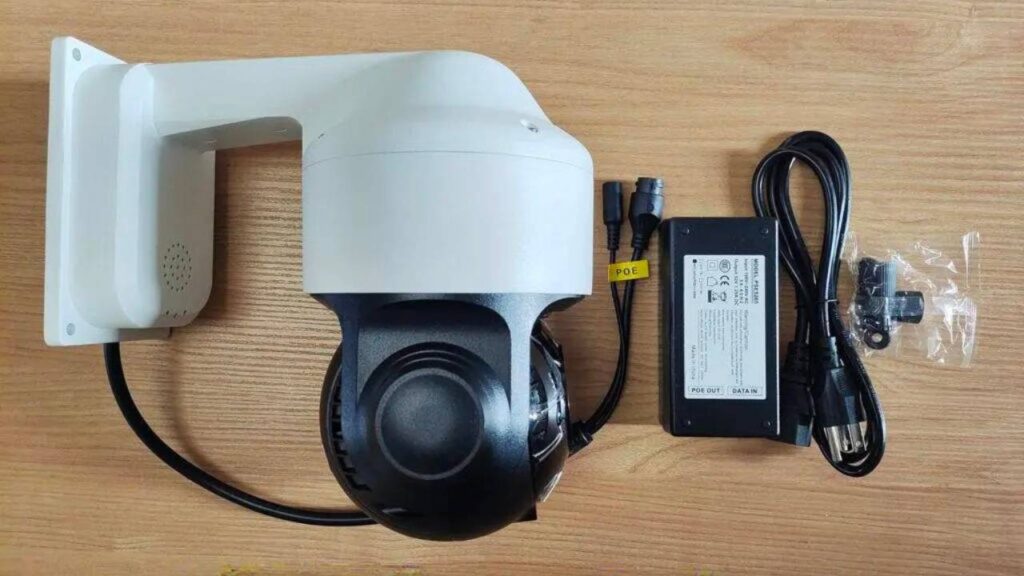
Wiring And Power Options
Choose how to power your cameras. Decide if you want wired or wireless connections.
Wired cameras need cables for power and data. Wireless ones use Wi-Fi but still need power.
- Use Ethernet cables for stable connections
- Consider Power over Ethernet (PoE) to reduce wires
- Wireless cameras need good Wi-Fi signals
- Place power outlets near cameras
- Plan cable routes to avoid damage
Optimizing Camera Placement
Put cameras where they get a clear view. Avoid spots with bright lights or glare.
Mount cameras high to stop tampering. Angle them to cover wide areas without blind spots.
- Place cameras 8 to 10 feet above ground
- Use wide-angle lenses for large spaces
- Check camera views on a monitor before final setup
- Avoid pointing cameras directly at windows or lights
- Use weatherproof cameras outside
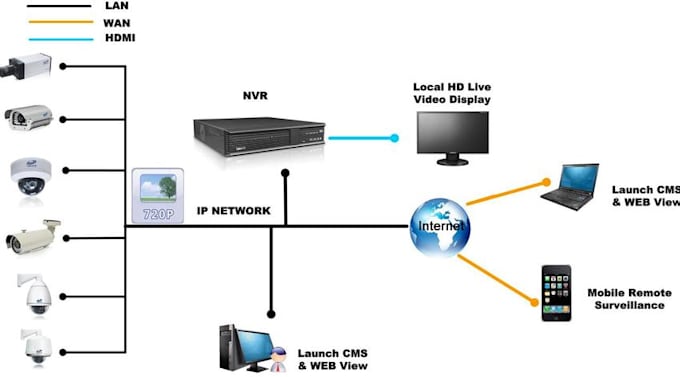
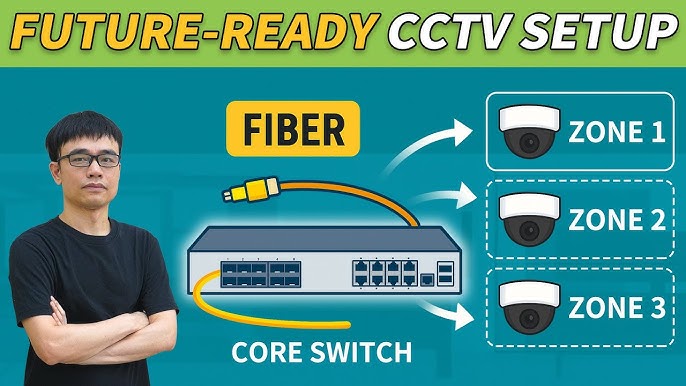
Selecting Network Equipment
Setting up a security camera network requires the right network equipment. Choosing good devices helps your cameras work smoothly.
Network equipment includes routers, switches, recorders, and cables. Each plays a key role in the system’s success.
Routers And Switches
Routers connect your security system to the internet. Switches help connect multiple cameras inside the local network.
Choose routers and switches with enough ports and good speed. Look for devices that support Power over Ethernet (PoE) for easy power and data delivery.
- Use a router with strong Wi-Fi or wired options
- Pick switches with enough PoE ports for cameras
- Check the speed: Gigabit switches are best
- Ensure the router supports your network size
Network Video Recorders (nvr)
An NVR stores and manages video from your cameras. It helps you watch live video and review recordings.
Select an NVR that matches your camera count and resolution. Look for easy setup and remote access features.
- Choose an NVR with enough channels for all cameras
- Check storage space for your video needs
- Look for support of high-resolution cameras
- Consider remote viewing capabilities
Cabling And Connectivity
Cables connect cameras to the network and power sources. Good cables ensure stable video and power supply.
Use quality Ethernet cables like Cat5e or Cat6 for better speed and distance. Keep cable runs short to avoid signal loss.
- Use Cat5e or Cat6 cables for network connections
- Choose shielded cables in areas with interference
- Keep cable length under 100 meters for best results
- Use PoE switches to reduce extra power cables
Setting Up Network Configuration
Setting up a security camera network requires proper network settings. This ensures smooth video streaming and remote access.
Correct network configuration helps avoid connection problems and keeps your cameras secure.
Ip Address Assignment
Each security camera needs a unique IP address on your network. This lets you find and control each camera easily.
Use static IP addresses or DHCP reservations to keep camera addresses the same over time.
- Static IP: Manually assign a fixed IP to each camera
- DHCP Reservation: Router assigns the same IP based on MAC address
- Avoid IP conflicts by keeping addresses unique
Port Forwarding And Firewall Settings
Port forwarding lets you access cameras from outside your network. It directs internet traffic to the camera’s IP and port.
Firewalls control network access. Adjust firewall rules to allow camera data while blocking unwanted connections.
- Open the camera’s port on your router
- Forward the port to the camera’s local IP address
- Check firewall settings to permit camera traffic
- Use non-default ports to reduce hacking risk
Ensuring Network Security
Protect your camera network from unauthorized access. Use strong passwords and keep firmware updated.
Disable unused services and encrypt your network traffic to keep data safe.
- Create strong, unique passwords for each camera
- Update camera firmware regularly
- Disable services you do not need on the camera
- Use WPA3 or WPA2 encryption on your Wi-Fi
- Consider using a separate network for your cameras
Installing And Mounting Cameras
Setting up a security camera network starts with installing and mounting the cameras properly. Good placement helps capture clear video and cover important areas.
Taking time to mount cameras right can improve your security system’s performance and avoid blind spots.
Tools And Accessories Needed
Before you start mounting, gather all the tools and accessories. This makes the job faster and easier.
- Drill with drill bits
- Screwdrivers (Phillips and flathead)
- Mounting brackets or plates
- Screws and wall anchors
- Measuring tape
- Level tool
- Cable clips or ties
- Electrical tape
- Power drill or screwdriver
Mounting Techniques
Choose a mounting spot that covers the needed area and is hard to reach by intruders. Use a level to keep the camera straight.
Secure the mounting bracket to the wall or ceiling with screws and anchors. Attach the camera firmly to prevent it from moving.
- Mount cameras high for wider views
- Use weatherproof cases for outdoor cameras
- Avoid pointing cameras at direct sunlight
- Hide cables to prevent tampering
- Seal cable holes to keep moisture out
Testing Camera Angles
After mounting, test each camera angle to ensure good coverage. Adjust the camera to remove blind spots.
Check the video feed on your monitor. Make sure the important areas are clearly visible and well-lit.
- Move the camera to cover entrances and exits
- Avoid glare from windows or lights
- Test cameras at night if needed
- Adjust zoom or focus for clarity
- Secure the camera after final adjustment
Credit: www.youtube.com
Integrating Software And Apps
Setting up a security camera network needs good software and apps. These tools help you control cameras easily.
Using software and apps lets you watch cameras from far away. It also sends alerts for any unusual activity.
Choosing Compatible Software
Pick software that works with your camera brand and model. Compatibility makes setup simple and stable.
Check if the software supports your camera features like night vision or zoom. This ensures full use of your system.
- Match software with your camera model
- Look for support of key camera features
- Choose software with good user reviews
Remote Viewing Setup
Remote viewing lets you watch your cameras from anywhere using a phone or computer. It needs an internet connection.
Install the app or software on your device. Log in with your camera system account to start live viewing.
- Ensure your cameras have internet access
- Download the right app for your device
- Secure your login details to protect access
Motion Detection And Alerts
Motion detection triggers alerts when the camera sees movement. This helps you react quickly to events.
Set up alerts in your software or app. Choose how you want to get notifications, like email or push alerts.
- Enable motion detection in your software
- Adjust sensitivity to avoid false alarms
- Select alert types: email, app push, or SMS
Maintaining Your Security Network
Keeping your security camera network working well needs regular care. This helps protect your home or business.
Simple maintenance can stop many problems before they start. It also keeps your system fast and reliable.
Regular Updates And Backups
Update your security system software often. Updates fix bugs and add new features. They keep your network safe from threats.
Backing up your settings and video files is very important. Backups help you recover data if something goes wrong.
- Check for firmware updates monthly
- Backup video footage to a secure location
- Save system settings before any changes
Troubleshooting Common Issues
Sometimes cameras or network devices stop working. Troubleshoot by checking power and connections first.
Clear camera lenses and clean devices regularly. Restart your system to fix minor glitches.
- Check camera cables and power supply
- Restart cameras and network routers
- Verify internet connection speed
- Review system logs for error messages
Enhancing System Performance
Improve your network speed by placing cameras close to routers. Use wired connections when possible.
Remove old recordings to free up storage. Adjust camera settings to balance quality and bandwidth.
- Use Ethernet cables for stable connections
- Set recording schedules to save space
- Lower video resolution if network is slow
- Regularly check for network interference
Frequently Asked Questions
What Equipment Is Needed For Security Camera Network Setup?
You need cameras, a network video recorder (NVR), cables, and a stable internet connection. Proper power sources and mounting brackets are also essential for a secure setup.
How Do I Connect Security Cameras To A Network?
Connect cameras to the router using Ethernet cables or Wi-Fi. Assign IP addresses and configure the network settings via the NVR or camera software.
Can I Access My Security Cameras Remotely?
Yes, remote access is possible through mobile apps or web portals. Ensure proper network configuration and strong passwords to maintain security.
What Is The Best Camera Placement For Network Setup?
Place cameras at entry points, high-traffic areas, and blind spots. Ensure clear views without obstructions and avoid direct exposure to harsh weather.
Conclusion
Setting up a security camera network isn’t complicated. Start by choosing the right cameras. Ensure they fit your needs and budget. Connect them securely to your network. Follow the manufacturer’s instructions closely. Test each camera’s view and connection. Adjust as needed for best coverage.
Regularly update software for security. This helps protect your home or business. A well-planned setup can provide peace of mind. Stay informed on new security technologies. They can enhance your system over time. Always keep security a priority. Protect what matters most to you.
19 min read