
Are you ready to make your home smarter and more connected? Setting up Home Assistant is easier than you think, and it can transform the way you control your lights, temperature, security, and more.
Imagine having everything at your fingertips, automated to fit your lifestyle perfectly. In this guide, you’ll discover simple steps to get started quickly and avoid common pitfalls. By the end, you’ll feel confident managing your smart home like a pro.
Let’s dive in and unlock the full potential of your space!
Choosing The Right Hardware
Setting up Home Assistant requires hardware that fits your needs. The right hardware helps your smart home run smoothly.
Think about your budget, space, and power use before picking hardware. This guide explains some popular choices.
Single-board Computers
Single-board computers are small and affordable. They use little power and work well for simple Home Assistant setups.
Popular options include Raspberry Pi and similar devices. They are easy to set up and have good community support.
- Low cost and low power use
- Compact size fits small spaces
- Good for beginners and hobbyists
Dedicated Servers
Dedicated servers offer more power and storage. They handle many devices and complex automations easily.
These servers run 24/7 and provide stable performance. They are best for users with large smart homes.
- High performance for many devices
- More storage for backups and logs
- Needs more power and space
Virtual Machines And Cloud Options
Virtual machines let you run Home Assistant on existing computers. Cloud options host it online with easy access.
These choices offer flexibility and remote control. They may require more technical knowledge to set up.
- Run on your current hardware without extra devices
- Access from anywhere with internet
- May need good internet speed and security
Installing Home Assistant
Home Assistant is a tool that helps you control smart devices at home. You can install it in different ways depending on your needs and hardware.
This guide explains three common ways to install Home Assistant. Each way has its own setup process and benefits.
Home Assistant Os Installation
Home Assistant OS is a complete system. It runs on a dedicated device like a Raspberry Pi. This method is simple and gives full features.
Download the Home Assistant OS image and flash it to an SD card. Insert the card into your device and power it on. The system will start and set up automatically.
- Download the right image for your device
- Use software like balenaEtcher to flash the image
- Insert SD card and power on the device
- Access Home Assistant via web browser on your network
Home Assistant Container Setup
Home Assistant Container runs as a Docker container. You need to have Docker installed on your system first. This setup is good for users with experience in containers.
Pull the Home Assistant image from Docker Hub. Run the container with the correct settings to use your devices and network.
- Install Docker on your machine
- Pull the Home Assistant image:
docker pull homeassistant/home-assistant - Run the container with volume and network settings
- Access Home Assistant through your browser
Home Assistant Core Installation
Home Assistant Core is the basic version. You install it in a Python environment on your existing OS. This option is for advanced users who want more control.
Set up Python and dependencies first. Then install Home Assistant Core using pip. Start the service and open Home Assistant in your browser.
- Install Python 3.8 or newer
- Create a virtual environment
- Activate the environment
- Run
pip install homeassistant - Start Home Assistant with
hasscommand
Configuring Network And Security
Setting up Home Assistant needs careful network and security settings. These steps help keep your smart home safe and reliable.
Proper network configuration makes sure your devices connect without problems. Good security stops unwanted access to your system.
Setting Static Ip And Port Forwarding
Assigning a static IP to your Home Assistant device helps keep it easy to find on your network. This prevents the IP address from changing after restarts.
Port forwarding allows you to access Home Assistant from outside your home network. It directs internet traffic to your device securely.
- Choose an IP outside your router’s DHCP range
- Set the static IP on your device or router
- Forward the correct port (default 8123) on your router
- Use a strong password to protect the forwarded port
Enabling Ssl And Secure Access
SSL encrypts data between your devices and Home Assistant. This keeps your information private and safe from hackers.
Use SSL certificates from trusted sources. Let’s Encrypt offers free certificates that work well with Home Assistant.
- Install an SSL certificate on your Home Assistant server
- Configure Home Assistant to use HTTPS
- Redirect all HTTP traffic to HTTPS
- Regularly update your certificates to avoid expiry
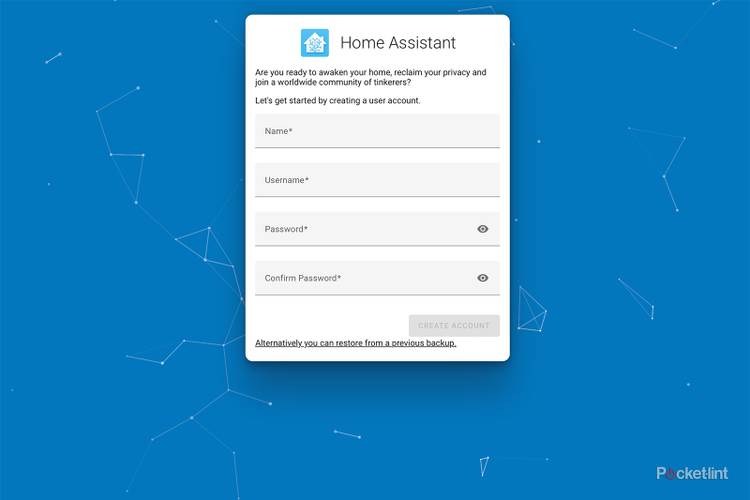
User Management And Permissions
Create separate user accounts for everyone who uses Home Assistant. This controls who can see and change settings.
Limit permissions based on user roles. Give admin rights only to trusted users to avoid mistakes or security risks.
- Set up user accounts with strong passwords
- Assign roles like admin, user, or viewer
- Review user permissions regularly
- Remove accounts that are no longer needed

Credit: www.youtube.com
Integrating Smart Devices
Home Assistant lets you control many smart devices from one place. It works with lights, sensors, switches, and more.
Connecting these devices helps you automate tasks and monitor your home easily.
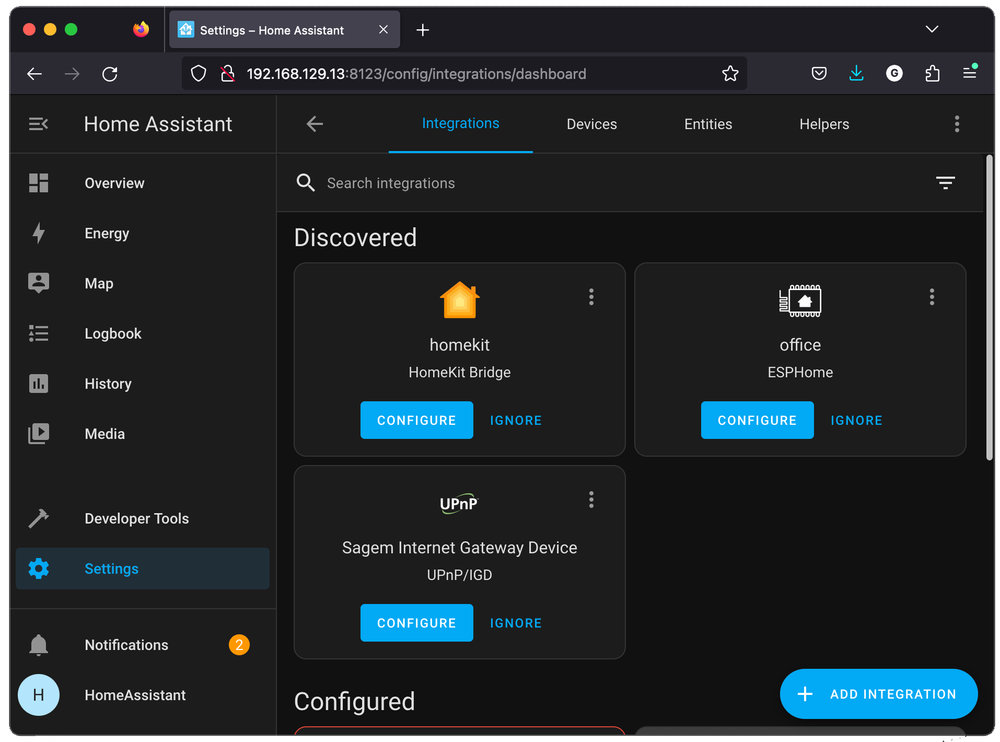
Popular Device Integrations
Home Assistant supports many popular smart devices. These include brands like Philips Hue, TP-Link, and Xiaomi.
You can add devices by using built-in integrations or installing add-ons from the community.
- Philips Hue lights and bulbs
- TP-Link smart plugs and switches
- Xiaomi sensors and cameras
- Google Nest thermostats
- Amazon Alexa devices
Custom Device Setup
Some devices need manual setup in Home Assistant. This means adding code to your configuration files.
You can define device names, types, and actions using YAML format. This lets you control unusual or unsupported devices.
- Identify the device’s IP address or unique ID
- Add device details in the configuration.yaml file
- Restart Home Assistant to apply changes
- Test the device for proper operation
Using Mqtt For Device Communication
MQTT is a messaging protocol used to connect smart devices. It sends data quickly and uses little power.
Home Assistant uses MQTT to talk with devices like sensors and switches. You need an MQTT broker to handle messages.
- Install an MQTT broker like Mosquitto
- Configure Home Assistant to connect to the broker
- Set devices to publish and subscribe to MQTT topics
- Use automations to react to MQTT messages
Automations And Scripts
Home Assistant lets you automate tasks in your smart home. Automations run actions based on triggers and conditions.
Scripts allow you to run multiple actions in a sequence. They add more control and flexibility to your setup.
Creating Basic Automations
Start with simple automations to control devices. For example, turn on lights at sunset or when you arrive home.
You set a trigger, then add actions. Conditions can limit when the automation runs.
- Choose a trigger like time, state, or event
- Add one or more actions such as turning on a switch
- Use conditions to add rules like “only if it’s dark”
Advanced Scripting Techniques
Scripts can run many actions one after another. Use scripts to create complex routines.
Scripts can include delays, loops, and choose actions based on conditions. This makes your home smarter.
- Use “delay” to pause between actions
- Add “repeat” to run actions multiple times
- Use “choose” to pick actions based on conditions
- Call scripts from automations for better control
Trigger And Condition Options
Triggers start automations. Conditions check if automations should run after a trigger.
Use many trigger types like state change, time, or device events. Conditions can check time, device states, or user presence.
- State trigger: runs when a device changes state
- Time trigger: runs at a specific time or interval
- Event trigger: runs on custom events
- Condition types: state, numeric, time, or template-based
- Combine conditions with “and”, “or” logic
Credit: www.espboards.dev
Customizing The User Interface
Home Assistant lets you change how your smart home looks and feels. You can make the interface simple or detailed.
Customizing helps you see what matters most. It also makes using Home Assistant easier every day.
Lovelace Dashboard Basics
The Lovelace dashboard is the main screen you see in Home Assistant. It shows your devices and sensors.
You can add, remove, or move cards to organize the dashboard. Each card shows different information or controls.
Adding Custom Cards
Custom cards let you add special features to the dashboard. They can show graphs, buttons, or maps.
You install custom cards using the Home Assistant Community Store or by adding code. This makes your dashboard more useful.
- Button cards for quick actions
- Gauge cards to show values
- Picture cards for cameras or scenes
- Map cards for location tracking
Themes And Layouts
Themes change colors and styles across the interface. Layouts control how cards are arranged on the screen.
You can pick dark or light themes. Layouts can be grid or vertical to fit your screen size and taste.
- Dark theme reduces eye strain at night
- Light theme works well during the day
- Grid layout shows many cards at once
- Vertical layout scrolls cards up and down
Maintenance And Troubleshooting
Keeping Home Assistant running smoothly needs regular care. Maintenance helps avoid problems.
Troubleshooting helps you fix issues fast. This saves time and keeps your system reliable.
Backup Strategies
Backups protect your data if something goes wrong. You should back up often.
Store backups on different devices or cloud storage. This keeps data safe from hardware failures.
- Use Home Assistant’s built-in snapshot feature
- Schedule regular automatic backups
- Save backups outside your main device
- Test backups by restoring them occasionally
Updating Home Assistant
Updates add new features and fix bugs. Keep your system up to date for better performance.
Before updating, create a backup. Updates can sometimes cause unexpected problems.
- Check the release notes for changes
- Update during low-use times
- Restart Home Assistant after updates
- Monitor the system for errors after updating
Common Issues And Fixes
Some problems happen often. Knowing quick fixes helps you keep control of your system.
Common issues include connection errors, slow response, and integration failures.
- Connection Errors:Check your network and restart the device.
- Slow Response:Clear cache and reduce active integrations.
- Integration Failures:Verify configuration files and update integrations.
- System Freezes:Reboot the system and check for hardware problems.

Credit: medium.com
Expanding Functionality
Home Assistant can do a lot by itself. You can add tools and features to make it work better.
Adding new parts helps you control more devices and create smart home routines easily.
Adding Third-party Add-ons
Third-party add-ons add new features to Home Assistant. You can find add-ons for media, security, and more.
These add-ons run inside Home Assistant and work well with your setup.
- Access extra tools like MQTT brokers or databases
- Use add-ons for backup and system monitoring
- Install apps for media players and smart devices
Using Node-red With Home Assistant
Node-RED lets you build smart home flows with a simple drag-and-drop interface. It connects to Home Assistant easily.
You can create automations by linking devices and actions without writing code.
- Use nodes to read sensor data
- Set conditions to trigger actions
- Control lights, switches, and alarms
Voice Assistant Integration
Home Assistant works with voice assistants like Alexa and Google Assistant. This lets you control devices by speaking.
You can set up voice commands to turn on lights, play music, or check your home status.
- Connect your voice assistant to Home Assistant
- Use voice commands to control smart devices
- Create routines triggered by voice
Frequently Asked Questions
What Is Home Assistant And Why Use It?
Home Assistant is an open-source platform for smart home automation. It lets you control devices locally, ensuring privacy and speed. It supports many brands, offering flexibility and customization. It simplifies managing smart devices from one interface, enhancing home convenience.
How Do I Install Home Assistant On My Device?
You can install Home Assistant on Raspberry Pi, a virtual machine, or a Docker container. Download the appropriate image from the official site. Follow the step-by-step installation guide. Ensure your device meets system requirements for smooth operation.
What Devices Are Compatible With Home Assistant?
Home Assistant supports thousands of devices, including lights, sensors, cameras, and thermostats. Popular brands like Philips Hue, Nest, and Xiaomi are compatible. The platform frequently updates integrations to include new devices, ensuring broad compatibility for smart homes.
How Do I Secure My Home Assistant Setup?
Use strong, unique passwords and enable two-factor authentication. Regularly update Home Assistant software to patch vulnerabilities. Configure secure remote access via HTTPS and VPN. Limit access permissions to minimize security risks.
Conclusion
Setting up Home Assistant is simpler than you might think. With basic steps, you can automate and control your home devices efficiently. This smart home hub offers flexibility and customization. It integrates well with many gadgets. Start small, and gradually expand your system.
You’ll enjoy enhanced convenience and control. Troubleshooting is easy with online resources. Embrace the future of home automation. Feel secure and comfortable with your smart home setup. Remember, patience and exploration are key. Happy automating!
21 min read